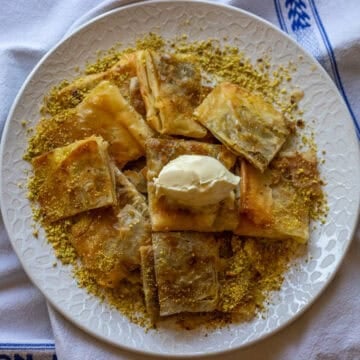
This Authentic Middle Eastern Walnut Baklava is a scrumptious creation that beautifully combines layers of filo pastry with the richness of walnuts and a sweet, simple syrup. But what truly makes this recipe special is the love and artisanship that goes into creating each delicate layer of hand-rolled phyllo sheets.

Jump to:
In many cultures, making baklava from scratch remains a cherished tradition, particularly during festive occasions like weddings or religious events such as Eid.
Although people often opt to purchase baklava from shops for everyday enjoyment, using ready-made filo pastries isn't as common when it comes to preparing this traditional dessert.
This recipe involves making baklava dough and rolling it into filo sheets, but don't worry, it's not as difficult as it may seem, and the end result is absolutely worth it.
However, if you're interested in learning how to make baklava using ready-made filo pastries, be sure to check out my baklava recipes for The Best Baklava Cheesecake, Cold Baklava - Soguk Baklava with Milk, and Easy Turkish Pistachio Baklava.
What is Baklava?
Baklava, (also known as Baklawa, Baklehwah, Batlehwah, or Batlawa) is a delightful pastry originating from the Middle East and Mediterranean regions. It is made by layering thin sheets of filo pastry and a mixture of finely chopped nuts, such as walnuts, pistachios, or almonds.
The pastry is then baked until golden and crispy before being soaked in a simple sweet syrup, and sometimes flavored syrup with ingredients like rosewater or orange blossom water.
The result is a scrumptious dessert that combines flaky pastry with a sweet and nutty filling, creating a delightful blend of textures and flavors. Just like Homemade Elderflower Turkish Delight (Lokum), Baklawa is often enjoyed on special occasions, celebrations, and gatherings, and it has become a beloved treat worldwide.

Difference Between Turkish and Lebanese Baklava?
Turkish Baklava is famous for its finely ground pistachio filling and delicate, flaky layers of pastry. It has a lighter syrup with a touch of tanginess from ingredients like lemon juice. Turkish baklava is often cut into square or diamond shapes and comes in various sizes.
Lebanese Baklawa is famous for its mix of nuts, including walnuts, almonds, and pistachios. The pastry layers are slightly thicker, resulting in a slightly denser texture. It features a fragrant syrup infused with rosewater or orange blossom water. Lebanese baklawa is typically cut into rectangular pieces and often comes in larger sizes.
Ingredients You'll Need
Please scroll down to the recipe card below for the full ingredients list with measurements, complete recipe method, recipe notes, and nutritional information.
For the Phyllo Dough

- Flour - Use strong bread flour for its high protein content, which promotes the development of strong gluten. This gluten adds structure, elasticity, and stretchiness to the dough, making it easier to roll out the dough into thin, delicate sheets without tearing.
- Milk - Opt for whole or semi-skimmed milk. It adds tenderness, and moisture, aids gluten formation, promotes browning when baked, and adds a subtle richness to the dough.
- Yogurt - Use plain natural yogurt. It creates a tender and moist texture, improves stretchability, and adds a subtle tangy flavor.
- Egg - Try and use free-range eggs at room temperature. The addition of eggs provides a richer texture and enhances the flavor of the dough.
- Oil - I use neutral flavored oil such as sunflower or vegetable oil. It enhances the dough's texture, flexibility, moisture, and tenderness.
- Vinegar - Use white wine vinegar, or cider vinegar to enhance elasticity, tenderness, and overall texture of phyllo dough.
Ingredients for Layering the Baklava

- Walnuts - They are one of the most popular fillings for Baklava and possibly my favorite! For the best results, toast the walnuts in the oven and carefully pulse them in a food processor, being careful not to turn them into a powder. Leave them with some texture.
- Butter - It is the key ingredient for making Authentic Middle Eastern Walnut Baklava. It is essential to clarify the butter before using it, as the milk solids will burn quickly and will give black spots on the baklava. Alternatively, you can use melted ghee. Use good-quality unsalted butter and don't skimp on it!
- Lemon - A few drops of lemon juice prevent the syrup from crystallizing. Don't use too much lemon juice as it will destroy the taste of the baklawa.
- Starch - Using cornstarch or wheat starch is necessary in order to prevent the dough from sticking, promote elasticity, and enhance texture.
How to Make Homemade Baklava From Scratch
I must warn you, don’t start making it if you are short of time. This authentic Baklava Recipe does take time and patience to make these delicious sweets.
If you want to treat your family on special occasions or celebrations like Christmas or Eid, and if you have enough cravings for good baklava, then this is the perfect homemade Middle Eastern Walnut Baklava recipe for you!
Follow step-by-step instructions and watch my video tutorial to achieve the best results.
Prepare the Dough
Place the eggs in a medium-sized bowl and then add the milk, vegetable oil, vinegar, yogurt, baking powder, and salt, and stir until combined.

Gradually add the flour to form a soft dough. The amount of flour might vary depending on your location or the humidity of the room.

Transfer the dough to a lightly floured work surface and knead it for a few minutes until it doesn't stick to your hands and it is elastic. Use the minimum amount of flour possible to keep the dough soft. Shape the dough into a ball and return it to the bowl.

Cover and let it rest for 15 minutes. Prepare the syrup while resting the dough.
Prepare the Simple Sugar Syrup
Place the water and sugar in a pan and put on medium heat. Stir it until the sugar dissolves, bring it to a boil, and let it gently boil for 15 minutes.

Add a few drops of lemon juice, let it simmer for a few more minutes, and then remove the pan from heat. Let it cool down while making the filo pastries.
Roll Out the Filo Pastries
Divide the dough into 36 small balls (1 oz/30 grams each) and group them into 3 of 12 balls.

I would recommend using a digital kitchen scale for this step. Cover the balls with a clean cloth and let them rest for another 10 minutes before rolling them out. Melt the butter in a saucepan, get rid of the milky bit on the bottom to clarify it, and add the vegetable oil. Take two of the balls and dip them into the cornstarch.

Roll them to the size of a small plate, sprinkle generously with cornstarch over them, and put them on one another.

Roll them out together as thinly as possible to a size of 33 cm - 13" Ø.

Use more starch as needed to avoid them sticking.

Place them on a 33 cm (13") Ø cake pan. Trim the sides if necessary, and place the trimmings on top of the filo pastries. Drizzle a spoonful of the melted butter mixture over the layer of phyllo pastry.

Repeat the same until you finish the first group of the dough balls (12 balls will make 6 filo sheets in total). Sprinkle half of the crushed walnuts over the built-up layers of filo sheets, and spread them evenly.

Start rolling the second group of dough balls and place them on top of the walnut mixture. You should have 6 more filo sheets made from 12 balls layered. Sprinkle the other half of the crushed nut filling over the built-up phyllo layers, and spread them evenly.
To complete the assembly of the baklava, roll your final batch of 12 dough balls into 6 phyllo pastry sheets, and then layer them on top of the crushed walnuts.

Cut the Baklawa into Diamonds and Stars Shape
With a sharp knife, first cut the baklava vertically from top to bottom, dividing it into two halves. Next, make a second vertical cut starting from the center and going towards the outer edge, creating four equal quarters.

Make sure you cut all the way through to the bottom layer. Now, cut each quarter into two, giving you 8 equal triangles.

Cut the triangles as shown in the next two pictures to create a neatly shaped star and diamond-cut baklava pieces. You can also check out the video in the recipe card to see how to cut the baklawa into perfect diamonds and stars.


Repeat the same with the remaining triangles. You can adjust the size of the pieces to your liking but I usually get about 65 to 70 pieces out of a tray size of 33 cm (13") Ø when I cut them the size of 4cm (1.5").

Bake the Walnut Baklawa
Preheat your oven to 180° C (356° F).Pour the remaining clarified butter and vegetable oil mixture evenly on top of the baklawa. Reheat it in a microwave or a small pan if necessary.
It might look like too much butter but it will all be absorbed by the filo pastries and it will turn them into golden crispy layers of deliciousness.

Place the baklava tray into the hot oven and bake for 15 minutes. Reduce the heat to 160° C (320° F) and then bake it for another 45 minutes or until it is golden brown on top. Also, check if the bottom layers are cooked through.

Soak the Baklawa
Remove the baklava from the oven and then slowly pour the cooled room-temperature syrup over it when still hot. Again, it might look like the baklava is swimming in the syrup but it all will be absorbed by the filo pastries in less than an hour.

Let the baklava soak in syrup overnight. It will taste better on the 2nd day and even better on the 3rd day.

Serving Suggestions
The rich and intense flavors of Turkish coffee or tea pair wonderfully with the sweetness of Authentic Middle Eastern Walnut Baklava. Sip on a cup of strong, aromatic Turkish Coffee or tea alongside your baklava for a traditional combination. Alternatively, serve it with a refreshing cup of mint tea to provide a delightful contrast to the sweetness of baklava. The cool and soothing flavors of mint complement the rich, nutty taste of the pastry.
Recipe Tips From the Chef
- Make sure you knead the filo dough until it is soft and elastic.
- Keep the dough balls covered at all times to avoid them drying.
- Use a generous amount of starch while rolling out the pastries. Brush off any extra starch left at the end of the rolling out.
- Use a thin rolling pin called oklava. It makes rolling out the filo pastries much easier and quicker.
- Cutting through crispy layers of phyllo dough can be challenging. Therefore, it is crucial to not only score but actually cut the pieces before baking the baklava.
- Cook the baklava on low heat slowly and thoroughly. Also, check if the bottom layers are cooked through.
- Make sure the baklava is hot and the syrup is cooled down to room temperature before soaking it.
- Let the baklava soak for at least 10 hours before serving.
Recipe FAQs
You can store baklava at room temperature for up to 5 days, in the fridge for up to 1 week, or in the freezer for up to 3 months.
It should be stored in an airtight container to preserve freshness.
Baklava was invented in Turkey during the Ottoman Empire but today, many Meditteranean and Middle Eastern countries have their own versions of it. Some countries use honey, cinnamon, or almonds which are not traditional ingredients for Turkish baklava.
Related Recipes
For more syrup-soaked Middle Eastern dessert recipes why not try:


Did you make this recipe? Please let me know how it turned out! Leave a comment below, tag @cookingorgeous on Instagram, and hashtag it#cookingorgeous.
I hope you enjoy the process of making this Authentic recipe for Middle Eastern Walnut Baklava as much as you enjoy eating it! 🙂
Bon appétit! / Afiyet olsun!
Want to Save This Recipe?
Enter your email & I'll send it to your inbox. Plus, get great new recipes from me every week!
By submitting this form, you consent to receive emails from Cooking Gorgeous

Authentic Middle Eastern Walnut Baklava
Equipment
- 1 kitchen scale
- 1 Sharp knife
- 1 measuring spoons
- 1 Measuring cups
- 1 13x2" round cake pan
- 1 ince oklava
Ingredients
For the Filo Dough
- 2 small eggs (lightly whisked)
- 1 cup milk (at room temperature) (237 ml)
- ½ cup vegetable oil (115 ml)
- 1 tablespoon yogurt
- 2 tablespoon white wine vinegar
- 1 teaspoon baking powder
- 1 pinch salt
- 5 cups strong white flour (600 grams)
For the Syrup
- 4 cups water (900 ml)
- 4 cups sugar (900 grams)
- few drops of lemon juice
Extra Ingredients for Building Baklava
- 13 oz chopped walnuts (for filling between filo pastries) (350 grams)
- 1½ cups corn or wheat starch (for rolling out the filo pastries) (200 grams)
- 6½ oz clarified butter (about 1¾ sticks) (210 ml)
- ½ cup vegetable oil or sunflower oil (115 ml)
Instructions
Preparing the Dough
- Place the eggs in a medium-sized bowl and then add the milk, vegetable oil, vinegar, yogurt, baking powder, and salt, stir until combined.
- Gradually add the flour to form a soft dough. The amount of the flour might vary depending on your location or the humidity of the room.
- Transfer the dough to a lightly floured work surface and knead it for a few minutes until it doesn't stick to your hands and it is elastic.
- Use the minimum amount of flour possible to keep the dough soft. Shape the dough into a ball and return it to the bowl.
- Cover and let it rest for 15 minutes. Prepare the syrup while resting the dough.
Preparing the Simple Syrup
- Place the water and sugar in a pan and put on medium heat.
- Stir it until the sugar dissolves, bring it to a boil, and let it gently boil for 15 minutes.
- Add a few drops of lemon juice, let it simmer for a few more minutes, and then remove the pan from heat.
- Let it cool down while making the filo pastries.
Rolling Out the Filo Pastries and Building the Baklava
- Divide the dough into 36 small balls (approximately 1 oz/30 grams each) and group them into 3 sets of 12 balls.
- Cover the balls with a clean cloth and let them rest for another 10 minutes before rolling them out.
- Melt the butter in a saucepan, get rid of the milky bit on the bottom to clarify it, and add the vegetable oil.
- Take two of the balls and dip them into the corn starch. Roll them to a size of a small plate, sprinkle generously with corn starch over them, and put them on one another.
- Roll them out together as thinly as possible to a size of 33 cm (13") Ø. Use more starch as needed to avoid them sticking.
- Place them on a baking tray size of 33 cm (13 ") Ø. Trim the sides if needed and place the trimmings on top of the filo pastry.
- Drizzle a spoonful of the melted butter mixture over the pastry.
- Repeat the same until you finish the first group of the dough balls (12 balls will make 6 filo sheets in total).
- Sprinkle half of the crushed walnuts over the built-up layers of filo sheets, and spread them evenly.
- Start rolling the second group of dough balls and place them on top of the walnuts. You should have 6 more filo sheets made from 12 balls.
- Sprinkle the other half of the crushed walnuts over the built-up layers of filo sheets, and spread them evenly.
- To complete the assembly of the baklava, roll your final batch of 12 dough balls into 6 filo sheets, and then layer them on top of the crushed walnuts.
Cutting the Baklawa into Diamond&Star Shape
- With a sharp knife, first cut the baklava vertically from top to bottom, dividing it into two equal halves.
- Next, make a second vertical cut starting from the center and going towards the outer edge, creating four equal quarters.
- Make sure you cut all the way through to the bottom layer. Now, cut each quarter into two, giving you 8 equal triangles.
- Cut the triangles as shown in the two pictures shown below in the post to create neatly shaped star and diamond-cut baklava pieces.You can also check out the video in the recipe card to see how to cut the baklawa into perfect diamonds and stars.
- Repeat the same with the remaining triangles.
Baking the Walnut Baklawa
- Preheat your oven to 180° C (356° F).
- Pour the remaining clarified butter and vegetable oil mixture evenly on top of the baklawa. Reheat it in a microwave or in a small pan if necessary.It might look like too much butter but it will all be absorbed by the filo pastries and it will turn them into golden crispy layers of deliciousness.
- Place the baklava tray into the hot oven and bake for 15 minutes.
- Reduce the heat to 160° C (320℉) and bake it for another 45 minutes or until it is golden brown on top. Also, check if the bottom layers are cooked through.
Soaking the Baklawa
- Remove the baklava from the oven and slowly pour the cooled syrup over it when still hot. Again, it might look like the baklava is swimming in the syrup but it all will be absorbed by the filo pastries in less than an hour.
- Let the baklava soak in syrup overnight. It will taste better on the 2nd day and even better on the 3rd day.
Video
Notes
- Make sure you knead the filo dough until it is soft and elastic.
- Keep the dough balls covered at all times to avoid them drying.
- Use a generous amount of starch while rolling out the pastries. Brush off any extra starch left at the end of the rolling out.
- Use a thin rolling pin called "". It makes rolling out the filo pastries much easier and quicker.
- Cook the baklava on low heat slowly and thoroughly. Also, check if the bottom layers are cooked through.
- Make sure the baklava is hot and the syrup is cooled down to room temperature before soaking it.
- Let the baklava soak for at least 10 hours before serving.
- You can store baklava at room temperature for up to 5 days, in the fridge for up to 1 week, or in the freezer for up to 3 months.
- Baklawa should be stored in an airtight container to preserve freshness.

Hosam says
This is a very good baklava!!!!! Made it - not as good as you - you are well experienced - but it came out really good - delicious! Wish I could roll like you!!!! Trying to get the roll-the-dough-on-the-rolling-pin technique - getting there - but not yet - and not as thin as you - but still came out good!
Ayla Clulee says
So happy you liked it, thank you for your lovely comment, Hosam!
Barb says
Second time making this. Yes it can be tedious but so worth it. This is by far the best recipe ever. Will never disappoint.
Jane says
Made Baklava and it is Perfect!
The layers are flaky, the top is crispy and the sweetness is perfect. If you want a tender tasty desert please make and enjoy!
Habibe says
I just took the baklava out of the oven and poured the syrup on and heard the ‘sizzle’. They look and smell delicious. This is my first time making them. Overnight is a longtime to wait but we will! Thank you for a great recipe. I know I’ll make it again.
Mariana says
This was an amazingly detailed recipe ! Very easy but time consuming. It was an excellent find and I can proudly say “Home made baklava” when I share it with my family!
Darlene says
I am going to rate it even though I have not tasted it because it does look great!
Eva says
Looks so good! I am checking my ingredients’ to see what all I’ll need. I am super excited to create my first authentic Turkish dessert ever.
Linda says
Excellent recipe; the baklava was perfect with no adjustments. It looked nice, cut into diamond shapes.
Ayla Clulee says
Thank you Linda, your feedback is really appreciated.
Best wishes
Ayla x
Claire says
They look so delicious! and tempting...
Kathy says
AMAZING. Follow directions and you will be wowed!
Geraldine says
I just made this and followed the direction exactly. A bit hard work but totally worth the effort. Family loved it!
Suzanne says
I will definitely give it a try this Ramadan. Video and pictures are very helpful!
Ayca says
My favourite Middle Eastern dessert. Thank you for sharing this lovely detailed recipe !