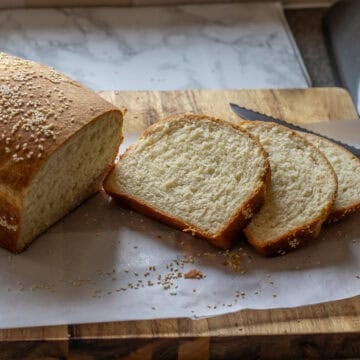
Japanese Hokkaido Milk Bread, also known as Shokupan, is a soft, fluffy, and delicate white bread with a cloud-like texture that practically melts in your mouth.

It is incredibly easy to make with a few basic pantry staples and is perfect for creating delicious sandwiches or serving as dinner rolls!
Jump to:
- What is Japanese Hokkaido Milk Bread?
- What is Tangzhong Method?
- Why This Recipe Works?
- Ingredients You'll Need
- How to Make Japanese Hokkaido Milk Bread (Shokupan) 2 Ways?
- Top Tips From the Chef
- How to Serve Fluffy Japanese Milk Bread?
- Storage Instructions
- Recipe FAQs
- Related Recipes
- Fluffy Japanese Hokkaido Milk Bread Recipe
Thanks to the tangzhong method (a popular technique for making super soft and long-lasting Asian bread), it stays fresh longer than regular bread.
This recipe for Japanese Hokkaido Milk Bread Buns is the key to successfully creating delicious bread with a golden-brown crust and a pillowy-soft white interior.

What is Japanese Hokkaido Milk Bread?
Japanese Hokkaido Milk Bread, also known as Shokupan, is a type of bread from Japan that's famous for its incredibly soft and fluffy texture. It's like biting into a cloud!
What makes these bread rolls special is the high-quality milk from Hokkaido, a region known for its creamy and delicious dairy products. To achieve that amazing texture, the bread is made using a special technique called tangzhong.
You can enjoy Japanese Hokkaido Milk Bread in different forms like loaves, rolls, or buns. It's perfect for making sandwiches or having as dinner rolls and has a subtle sweetness that makes it a real treat.

What is Tangzhong Method?
The Tangzhong method is a special technique used in bread baking. To make the Tangzhong, you cook a small amount of flour and water on the stove until it becomes thick like a gel. Once it cools down, you mix it into the dough when you're making bread.
Bakers love using the Tangzhong method, especially in Asian bread recipes like Japanese Hokkaido Milk Bread. Using the Tangzhong method comes with some great benefits:
- It helps the bread stay moist and fresh for longer.
- Tangzhong also gives the bread a fluffy and delicate texture, making it extra soft to bite into.
- It gives the bread a wonderful texture and a beautiful golden crust.
- The cooked paste adds structure to the bread and helps it hold its shape.

Why This Recipe Works?
- The Tangzhong technique adds moisture and makes the bread incredibly soft and tender. It helps keep the bread fresh for longer and gives it a delightful texture.
- This recipe is all about accuracy. Using a kitchen scale and measuring everything precisely ensures that your bread turns out just right.
- As this bread bakes, it fills your kitchen with an irresistible, comforting aroma that makes your home feel warm and inviting.
- This Japanese Hokkaido Milk Bread is incredibly versatile. Whether you want to make sandwiches, toast, or dinner rolls, this recipe has got you covered.
- Baking bread from scratch is a rewarding experience, and this recipe provides you with all the guidance you need.
- You'll be able to find detailed instructions on how to make both bread rolls and loaf.
Ingredients You'll Need
Please scroll down to the recipe card below for the full ingredients list with measurements, complete recipe method, recipe notes, and nutritional information.

- Strong white flour/bread flour - Make sure to use white bread flour that has a higher protein content than 'regular' flour and is perfect for the light and fluffy texture we are after.
- Milk - It adds a rich and creamy flavor, as well as provides additional moisture to the dough. I use full-fat whole milk but semi-skimmed would work too.
- Yeast - Use instant yeast, active dry yeast, or alternatively fresh yeast if you prefer. You need to double the amount if using fresh yeast.
- Salt - It increases the strength of the dough as well as the flavor. Also, it is necessary for the steady and slow rise of the dough. I use regular table salt but you can substitute it with kosher salt or fine sea salt.
- Unsalted butter - It adds flavor and gives the bread a pillowy and soft texture.
- Sugar - You can use caster sugar or granulated sugar. It feeds the yeast and helps the dough rise.
- Egg - Use a medium-sized, fresh, free-range egg at room temperature. Additionally, if you desire a golden, shiny crust, you will need a small-sized egg for the egg wash.
How to Make Japanese Hokkaido Milk Bread (Shokupan) 2 Ways?
Prepare the Tangzhong
In a small saucepan, combine strong white bread flour and water. Whisk them together until there are no lumps and the mixture is smooth.
Place the saucepan over medium heat and continuously whisk the mixture as it cooks. Keep whisking to prevent any clumps from forming. Cook the mixture until it thickens into a gel-like consistency. This typically takes about 2 to 3 minutes.
You will notice that the mixture becomes thicker and more viscous as it heats up.

Once the tangzhong has thickened, remove the saucepan from the heat and let it cool completely. The tangzhong mixture should have a smooth and sticky texture.
Form the Dough
In a mixing bowl of a stand mixer fitted with the dough hook attachment, combine white bread flour, fast-action dry yeast, sugar, and 1 teaspoon of salt.

Mix them until well combined. Add cooled tangzhong (at room temperature), warm milk, and egg to the dry ingredients.

Mix on low speed until a rough and sticky dough forms.

Add the melted butter gradually, and then increase the speed to medium. Knead the dough in the stand mixer for about 8-10 minutes, or until it becomes smooth, elastic, and pulls away from the sides of the bowl.

Shape the dough into a ball and place it in a greased bowl. Cover the bowl with a clean kitchen towel or plastic wrap and let it rise in a warm place for about 1 to 1.5 hours, or until it doubles in size.

Shape the Dough for Dinner Rolls
Divide the risen dough into 9 equal pieces.

Take each piece and bring all of the edges towards the center to create a compact ball.

Flip the ball over so that the seam side is facing downwards. Using your palms, cup the dough ball and rotate it on the work surface to create surface tension. This will help the dough keep its shape during baking.

If the dough feels sticky, use a little flour as needed to prevent it from sticking to your hands. Repeat the process for the remaining portions of dough until all the balls are shaped.
Place the shaped rolls into a lightly greased 23 cm (9") springform cake tin or a baking dish of approximately 23cm x 23cm (9 inches x 9 inches) in size or equivalent.

The rolls should be positioned so that they are lightly touching each other, but not too tightly packed. Cover the baking dish with a clean kitchen towel and let the dough rise for another 45 minutes to 1 hour, or until the rolls have doubled in size.

Bake the Hokkaido Milk Rolls
Preheat your oven to 180° C (350° F). Once the dinner rolls have risen, if desired, brush the tops with a beaten egg for a shiny crust.

Bake them in the preheated oven for about 20-25 minutes, or until they turn a deep golden brown.

Remove the bread from the oven and let it cool on a wire rack before serving the dinner rolls.
Shape the Dough for Loaf
For the loaf method, divide the dough into three equal pieces. Turn them into balls.

Flatten each dough roll into a rectangular, and fold the long sides towards the middle.


Roll it tightly from the short side into a log/spiral shape and pinch the seam to seal. Place it to a prepared 9" loaf pan, and repeat with the other 2 rolls.


Cover the loaf, let it rise for 45 minutes, brush with a beaten egg, and bake in a preheated oven for 25-30 minutes, or it is deep golden brown.


Top Tips From the Chef
- Baking is a science, so make sure to measure your ingredients accurately. Use a kitchen scale for precise measurements, especially for flour and liquids, to ensure consistent results.
- It's essential to let the tangzhong cool down to room temperature before adding it to the dough.
- Proper kneading develops gluten, contributing to the bread's structure and texture. Knead the dough until it becomes smooth and elastic, and springs back when lightly pressed. To ensure that the gluten has developed properly in your dough, use the windowpane test.
- Give the dough enough time to rise properly. Use the timings provided in the recipe as a guide, but be mindful of the room temperature and make necessary adjustments. The key is to ensure that the dough doubles in size during the rising process.
- Find a warm spot in your kitchen for the dough to rise. Avoid exposing it to drafts, as they can affect the fermentation process and result in uneven rising.
- For a beautiful golden crust, brush the shaped dough with an egg wash before baking. This gives the bread an attractive sheen and adds a touch of richness.
- Every oven is different, so keep a close eye on your bread while it bakes. Follow the recommended temperature and time in the recipe, and adjust if necessary to achieve a perfectly baked loaf.
How to Serve Fluffy Japanese Milk Bread?
Japanese Milk Bread Rolls, with their soft and fluffy texture, are incredibly versatile. You can enjoy them in various ways:
- Toasted with butter and jam - Just like my other bread recipes, such as Homemade Sandwich Bread and Dutch Oven Sourdough Bread, they are perfect with some butter and your favorite jam (you can try it with Easy Rhubarb Jam), or preserves for a simple yet delicious breakfast or snack.
- Sandwiches - Japanese Milk Bread is perfect for sandwiches. Use it to make classic sandwiches like ham and cheese, tuna salad, or turkey with avocado. The soft texture of the bread pairs well with a variety of fillings.
- Bread pudding - Stale Japanese Milk Bread can be given a new life by turning it into a delightful bread pudding. Tear the bread into bite-sized pieces, soak them in a mixture of eggs, milk, sugar, and your favorite flavorings like cinnamon or vanilla, then bake until golden and custardy.
- Tear and share - Serve the whole loaf as a centerpiece at a gathering or family meal. Simply tear off pieces of the soft bread and pass them around.
Storage Instructions
Let the bread cool completely before storing it. This helps maintain its texture. Wrap the bread tightly with plastic wrap or place it in an airtight container to prevent it from drying out and picking up unwanted odours.
You can store the bread for up to 3 days at room temperature in a cool and dry spot, away from direct sunlight or heat sources.
You can freeze them to extend their shelf life. Wrap them individually and store them in a freezer-safe bag or container. Thaw frozen bread at room temperature or lightly toast it in a toaster or oven.
Recipe FAQs
Japanese Hokkaido Milk Bread stands out from regular bread with its distinct characteristics.
It is famous for its soft and fluffy texture, thanks to the tangzhong method that adds moisture and creates an airy crumb.
Additionally, Asian milk bread has a longer shelf life and a subtly sweet flavor, making it a delightful treat on its own or as a versatile ingredient.
While bread flour is recommended for the best results, you can use all-purpose flour as a suitable substitute in this recipe for Japanese Hokkaido Milk Bread.
Keep in mind that the protein content in bread flour is higher, which helps with gluten development and contributes to a chewier texture and a better rise.
When using all-purpose flour, your bread may have a slightly softer texture, not rise as high, and have a less fluffy consistency. However, it will still turn out delicious.
Yes, you can substitute whole milk with alternative options like almond milk or soy milk in this recipe.
However, it's important to note that using different types of milk may slightly alter the flavor and texture of the bread.
Whole milk contributes to the richness and moisture in the dough, so alternative milk might result in a slightly lighter or less rich outcome.
Related Recipes
For more delicious homemade bread recipes why not try:


Did you make this recipe? Please let me know how it turned out! Leave a comment below, tag @cookingorgeous on Instagram, and hashtag it#cookingorgeous.
I hope you enjoy the process of making this recipe soft, pillowy, and irresistibly delicious "Fluffy Japanese Hokkaido Milk Bread" as much as you enjoy eating it! 🙂
Bon appétit! / Afiyet olsun!
Want to Save This Recipe?
Enter your email & I'll send it to your inbox. Plus, get great new recipes from me every week!
By submitting this form, you consent to receive emails from Cooking Gorgeous

Fluffy Japanese Hokkaido Milk Bread Recipe
Equipment
- 1 kitchen scale
- 1 Measuring cups
- 1 measuring spoons
- 1 9" springform cake tin
Ingredients
For Tangzhong
- 2 ½ tablespoon strong white bread flour
- ⅓ cup water
For the Dough
- 2 ½ cups strong white bread flour
- 2 ¼ teaspoon fast action dry yeast
- ¼ cup caster or granulated sugar
- 1 teaspoon salt
- ⅓ cup tangzhong (cooled down to a room temperature)
- ½ cup full-fat milk (whole milk) (lukewarm)
- 1 large egg
- 3 ½ tablespoon unsalted butter (melted and cooled down)
For Glazing
- 1 small egg
Instructions
Preparing the Tangzhong
- In a small saucepan, combine the strong white bread flour and water. Whisk them together until there are no lumps and the mixture is smooth.
- Place the saucepan over medium heat and continuously whisk the mixture as it cooks. Keep whisking to prevent any clumps from forming.
- Cook the mixture until it thickens into a gel-like consistency. This typically takes about 2 to 3 minutes. You will notice that the mixture becomes thicker and more viscous as it heats up.
- Once the tangzhong has thickened, remove the saucepan from the heat and let it cool completely. The tangzhong should have a smooth and sticky texture.
Forming the Dough
- In a mixing bowl of a mixer fitted with the dough hook attachment, combine white bread flour, fast-action dry yeast, sugar, and salt. Mix them until well combined.
- Add cooled tangzhong (at room temperature), lukewarm milk, and 1 large egg. Mix on low speed until a rough dough forms.
- Add the melted butter gradually, and then increase the speed to medium.
- Knead the dough in the stand mixer for about 8-10 minutes, or until it becomes smooth, and elastic, and pulls away from the sides of the bowl.
- Shape the dough into a ball and place it in a greased bowl.
- Cover the bowl with a clean kitchen towel or plastic wrap and let it rise in a warm place for about 1 to 1.5 hours, or until it doubles in size.
Shaping the Dough for Rolls
- Divide the risen dough into 9 equal portions.
- Take each piece and bring all of the edges towards the center to create a compact ball.
- Flip the ball over so that the seam side is facing downwards.
- Using your palms, cup the dough ball and rotate it on the work surface to create surface tension. This will help the dough keep its shape during baking.
- If the dough feels sticky, use a little flour as needed to prevent it from sticking to your hands.
- Repeat the process for the remaining portions of dough until all the balls are shaped.
- Place the shaped rolls into a lightly greased 23 cm (9") springform cake tin or a baking dish of approximately 23cm x 23cm (9 inches x 9 inches) in size or equivalent.
- The rolls should be positioned so that they are lightly touching each other, but not too tightly packed.
- Cover the baking dish with a clean kitchen towel and let the dough rise for another 45 minutes to 1 hour, or until the rolls have doubled in size.
Baking the Bread Rolls
- Preheat your oven to 180° C (350° F).
- Once the dinner rolls have risen, if desired, brush the tops with a beaten egg for a shiny crust.
- Bake them in the preheated oven for about 20-25 minutes, or until they turn golden brown and sound hollow when tapped on the bottom.
- Remove the bread from the oven and let them cool on a wire rack before serving the dinner rolls.
Shaping the Dough for Loaf
- For the loaf method, divide the dough into three equal pieces. Turn them into balls.
- Flatten each dough roll into a rectangular, and fold the long sides towards the middle.
- Roll it tightly from the short side into a log/spiral shape and pinch the seam to seal. Place it to a prepared 9" loaf pan, and repeat with the other 2 rolls.
- Cover the loaf, let it rise for 45 minutes, brush with a beaten egg, and bake in a preheated oven for 25-30 minutes, or it is deep golden brown.
Video
Notes
- Baking is a science, so make sure to measure your ingredients accurately. Use a for precise measurements, especially for flour and liquids, to ensure consistent results.
- It's essential to let the tangzhong cool down to room temperature before adding it to the dough.
- Proper kneading develops gluten, contributing to the bread's structure and texture. Knead the dough until it becomes smooth and elastic, and springs back when lightly pressed.
- Give the dough enough time to rise properly. Use the timings provided in the recipe as a guide, but be mindful of the room temperature and make necessary adjustments. The key is to ensure that the dough doubles in size during the rising process.
- Find a warm spot in your kitchen for the dough to rise. Avoid exposing it to drafts, as they can affect the fermentation process and result in uneven rising.
- For a beautiful golden crust, brush the shaped dough with an egg wash before baking. This gives the bread an attractive sheen and adds a touch of richness.
- Every oven is different, so keep a close eye on your bread while it bakes. Follow the recommended temperature and time in the recipe, and adjust if necessary to achieve a perfectly baked loaf.
Nutrition
This post uses affiliate links. This means that if you click on them and then buy something, we get a small amount of commission to keep the site running, but it doesn’t cost you anything more.


Tara Burton says
How can I make this recipe into a loaf instead of rolls? How long would I cook it for?
Ayla Clulee says
Hi Tara
To shape the bread into a loaf, separate the dough into three equal pieces after the first rise. Flatten each dough roll into a rectangular, fold the long sides towards the middle and roll it tightly from the short side into a log/spiral shape. Pinch the seam to seal. Place it to a prepared 9" loaf pan, and repeat with the other 2 rolls. Cover the loaf, let it rise for 45 minutes, and bake in a preheated oven for 30-35 minutes.
Hope this helps
Ayla
Sylvie says
Beautiful rolls, they look delicious. Thank you for the recipe