If you're looking for a new baking challenge that will leave you feeling proud, this recipe for Dutch Oven Sourdough Bread is just what you need.
With this simple recipe, you'll learn how to make a deliciously tangy, crusty, and airy sourdough bread with a perfectly crisp crust and an airy, chewy interior. All you need is a Dutch oven and a handful of simple ingredients.

Jump to:
On our blog, we have several beginner-friendly recipes for homemade bread that we adore, including Homemade Sandwich Bread, Black Pepper Sourdough Focaccia, Homemade Sourdough Dinner Rolls, Rustic Sourdough Flatbread Recipe, and Palestinian Flatbread.
This recipe for Dutch Oven Sourdough Bread is equally easy to follow and make.

What is Sourdough?
Sourdough bread is like no other bread out there - it doesn't need commercial yeast to rise. Instead, it gets its superpowers from a "sourdough starter" made from flour and water, mixed with wild yeast and bacteria. This is what makes sourdough so delicious and easier for us to digest.
You can tell the difference between sourdough bread and any other bread just by its tangy, sour taste and chewy texture. And you know what? That unique flavor and texture are all thanks to the magical process of fermentation. Plus, fermentation also helps the bread last longer, which is always a good thing.
Where to Obtain a Sourdough Starter?
Before you begin to make this gorgeous Dutch Oven Sourdough Bread recipe, you need a sourdough starter. All the sourdough starters are different and there are a few ways to get one:
- Make it yourself: All you need to do is mix flour and water, let it sit for a few days, and it will become a bubbly starter.
- Buy from a bakery: Some bakeries might sell sourdough starters that you can use to make your bread at home.
- Ask a friend: You might know someone who already has an active sourdough starter and is happy to share it with you.
- Order online: You can find sourdough starters available for purchase on specialty stores and marketplaces such as Amazon.

Why Make Sourdough Bread in a Dutch Oven?
When it comes to baking sourdough bread, using a Dutch oven has its perks. Here are some of the advantages:
- Improved crust: The high heat and steam in a Dutch oven make the crust super crispy and delicious.
- Even heat distribution: With its heavy cast iron construction, your bread will be cooked evenly all around.
- Moisture retention: The tight lid traps moisture in the Dutch oven, so your bread won't dry out and will have a moist, tender crumb.
- Better rise: The steam in the Dutch oven makes your bread dough rise beautifully, giving you a light, airy texture.
- Enhanced flavor: The high heat caramelizes the natural sugars in the bread dough, giving your bread that rich and complex sourdough flavor.
Overall, baking sourdough in a Dutch oven is a game changer. It's easy and totally worth it for that amazing crust, tender crumb, and delicious flavor!
Ingredients You'll Need
Please scroll down to the recipe card below for the full ingredients list with measurements, complete recipe method, recipe notes, and nutritional information.

Active Sourdough Starter
An active sourdough starter is a mixture of flour and water that has been left to ferment for several days, resulting in a bubbly and lively culture of wild yeast and bacteria.
To achieve a beautiful rise and texture in your sourdough bread, it's important to use an active, strong, and fed starter that has just peaked and is full of bubbles.
It is the key ingredient for this recipe, and you can either make your own by following simple instructions or obtain it from a bakery, a friend, or online from Amazon.
To activate your sourdough starter, you'll need to do it 12 hours before you want to start making your Dutch Oven Sourdough Bread. Mix 40 grams of sourdough starter with 40 grams of water and 40 grams of plain all-purpose flour. Cover it with a lid or cling film and leave it somewhere warm for 12 hours, or until you're ready to use it.
Other than an active sourdough starter, you'll need to gather a few more things:
- Plain/all-purpose white flour - You can substitute it with strong bread flour if you prefer.
- Honey - It adds flavor to the loaf. It is optional and you can omit it if you prefer.
- Salt - I use regular table salt but you can substitute it with kosher salt or fine sea salt.
- Water - Make sure the temperature of the water is about 40 °C (105 °F) for best results.
What Equipment Do You Need?
- Dutch oven with a lid - I love my Lodge Dutch Oven because it is simple and inexpensive. A size of a minimum of 4.5 qt to 6 qt is ideal for this recipe.
- Kitchen scale - It's important to get the right ratios of ingredients to ensure the sourdough bread turns out just right. Measuring by weight is more accurate than measuring by volume, so a digital kitchen scale is absolutely necessary.
- Bread scorer - Although you need a bread scorer or a lame blade to score the dough, you can also use a very sharp knife or a razor if you are not baking bread often.
- Bread knife - A good quality and sharp serrated bread knife will be your best friend when you try to slice this deliciously crusty sourdough loaf.
- Parchment paper - To avoid any burns or dropping your sourdough loaf when placing it in a preheated Dutch oven, it's important to use non-stick parchment paper. This will help you carefully lower the dough into the oven with ease.
Step-by-Step Instructions
This is a very simple recipe and has very few hands-on steps. However, you need to follow a few simple steps to achieve the best results:
Mix the Dough
To achieve a beautiful rise and texture in your sourdough bread, it's important to use an active, strong, and fed starter that has just peaked and is full of bubbles.
To activate your sourdough starter, you'll need to do it 12 hours before you want to start making your Dutch Oven Sourdough Bread. Mix 1 ½ (40 grams) of sourdough starter with 1 ½ oz (40 grams) of water and 1 ½ (40 grams) of all-purpose flour (plain flour).

Cover it with a lid or cling film and leave it somewhere warm for 12 hours, or until you're ready to use it.


In a large mixing bowl, combine the active sourdough starter, all-purpose flour, honey (optional), and water. Mix until there are no dry spots. Cover the bowl with a clean tea towel and let it rest for 30 minutes.

After 30 minutes, add the salt to the dough. Mix until well combined. You can use your hands or a wooden spoon to mix the dough. The dough will be sticky, but that's normal.

Cover the bowl with a tea towel and leave it to rest for 45 minutes.
Stretch and Fold
After the dough has rested for 45 minutes, it's time to use the stretch-and-fold method. This method helps the gluten develop, which is what gives sourdough bread its signature chewy texture.

To do the stretch-and-fold method, wet your hands and grab the dough from the bottom of the bowl.

Stretch it upwards and fold it over itself.

Rotate the bowl a quarter turn and repeat the process. Do this four times, so you've done a full rotation.
Cover the bowl with a tea towel and let it rest for 30 minutes. Repeat the stretch-and-fold method three more times, with 30-minute rests in between each round.

Proof and Shape the Dough
After the last stretch-and-fold, let the dough bulk ferment at room temperature overnight, for about 6-12 hours. This is called the bulk fermentation stage, and it allows the dough to rise.
Bulk fermentation might vary depending on factors such as the temperature, strength of the sourdough starter, and type of flour used. Warmer temperatures speed up fermentation, while colder temps slow it down.
A strong starter works faster than a weaker one, and different flours ferment at different rates. Just keep an eye on your dough and use timing as a guide - you'll know it's ready when it's risen, bubbly, and smells slightly sour.

Transfer the dough to a lightly floured clean surface, making sure not to deflate the dough too much.

Shape the dough into a ball by pulling the sides towards the center and pinching them together.

Then, flip the dough over so that the smooth side is facing up. Place the dough into a glass bowl lined with a towel that's been dusted with rice flour, with the seam side facing up.

You can also use a banneton basket dusted with rice flour. Cover the dough and let it proof for another 30 minutes to an hour, or until it has visibly risen and feels puffy.
Bake in a Dutch Oven
While the dough is proofing, preheat your oven to 230° C (450° F) and place your Dutch oven inside to preheat as well. Place a long piece of parchment paper over the bowl with the dough.
Flip the bowl over onto the countertop so that the dough is now on top of the parchment paper. The dough should hold its shape without collapsing.

To help the dough expand evenly in the oven, use a sharp knife or a razor blade to score the top with a decorative pattern. You can score in the areas where you want the dough to puff up, preventing random cracking.

With the help of parchment paper, gently transfer the dough into the preheated Dutch oven. Place a few ice cubes underneath the parchment to create steam and help the bread rise better.

Put the lid back on and bake it for about 20 minutes.

Take the lid off, reduce the oven temperature to 200℃ (390℉), and bake it for another 25-30 minutes, or until the crust is a beautiful golden brown and the bread sounds hollow when you tap it underneath.

Take the bread out of the Dutch oven and let it cool on a wire rack for at least an hour before slicing and serving.
Top Tips From the Chef
- Make sure your sourdough starter is active, strong, well-fed, and at its peak with lots of bubbles.
- Use a digital kitchen scale to measure your ingredients as precisely and accurately as possible.
- The stretch and fold method helps the gluten develop, giving sourdough bread its signature chewy texture.
- Bulk fermentation might vary depending on factors such as the temperature, strength of the sourdough starter, and type of flour used. Warmer temperatures speed up fermentation, while colder temps slow it down. A strong starter works faster than a weaker one, and different flours ferment at different rates.
- To help the dough expand evenly in the oven, use a sharp knife or a razor blade to score the top with a decorative pattern.
- Preheat your Dutch oven before adding the bread dough to ensure even heat distribution.
- Let the bread cool completely before slicing to prevent it from becoming gummy.
How to Store Homemade Sourdough Bread?
To store your homemade sourdough bread, let it cool down completely to room temperature first. Then, wrap it tightly in a clean, dry kitchen towel or paper bag, so it can breathe and stay dry.
Another option is to keep it in a bread box or paper bag with the top loosely folded over. But avoid storing it in plastic bags, as it can make the crust soggy. Keep in mind that sourdough bread tends to stale quickly as it doesn't contain preservatives. So, it's best to consume it within a few days of baking.
If you need to store the bread for a longer period, freezing is a great option. Personally, I like to double the recipe and make two loaves of Dutch Oven Sourdough Bread. Once the loaves have cooled down, I slice them and wrap them in plastic or store them in a freezer-safe bag.
Frozen sourdough bread can last for several months, and it can be defrosted at room temperature or in a toaster.
Recipe FAQs
Yes, you can bake sourdough bread in a regular oven, but the Dutch oven helps to create a moist environment and a crusty exterior. If you don't have a Dutch oven, you can use a baking stone or a cast iron skillet instead.
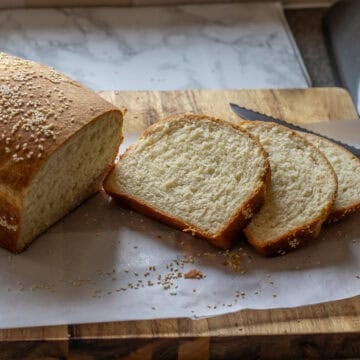
The bread is done when it has a deep golden-brown color and sounds hollow when tapped on the bottom.
The ideal size Dutch oven for baking bread is usually around 4.5 qt to 6 qt.
This size gives your bread enough room to puff up and spread out while also giving you a nice, crispy crust.
However, the size can also depend on the size of the bread you're baking.
It should fit your dough comfortably and give you the crust and rise you're looking for.
Related Recipes
For more delicious homemade bread recipes why not try:


Did you make this recipe? Please let me know how it turned out! Leave a comment below and tag @cookingorgeous on Instagram and hashtag it #cookingorgeous.
I hope you enjoy the process of making this deliciously tangy and crusty Dutch Oven Sourdough Bread much as you enjoy eating it! 🙂
Bon appétit! / Afiyet olsun!
Want to Save This Recipe?
Enter your email & I'll send it to your inbox. Plus, get great new recipes from me every week!
By submitting this form, you consent to receive emails from Cooking Gorgeous

Dutch Oven Sourdough Bread
Equipment
- 1 kitchen scale
- 1 Lodge Dutch oven
- 1 bread scorer
- 1 Sharp knife
Ingredients
- ½ cup active sourdough starter (120 grams)
- 4 cups plain white flour / all-purpose flour (500 grams)
- 1 ½ cups water (360 ml)
- 2 teaspoon salt
- 1 ½ teaspoon honey
- 3 tablespoon rice flour (for preventing the dough sticking to dutch oven)
Instructions
Mixing the Dough
- To activate your sourdough starter, you'll need to do it 12 hours before you want to start making your Dutch Oven Sourdough Bread.
- Mix 1 ½ (40 grams) of sourdough starter with 1 ½ oz (40 grams) of water and 1 ½ (40 grams) of all-purpose flour (plain flour). Cover it with a lid or cling film and leave it somewhere warm for 12 hours, or until you're ready to use it.
- In a large mixing bowl, combine the active sourdough starter, all-purpose flour, honey (optional), and water. Mix until there are no dry spots. Cover the bowl with a clean tea towel and let it rest for 30 minutes.
- After 30 minutes, add the salt to the dough. Mix until well combined. You can use your hands or a wooden spoon to mix the dough. The dough will be sticky, but that's normal.
- Cover the bowl with a tea towel and leave it to rest for 45 minutes.
Stretching and Folding
- After the dough has rested for 45 minutes, it's time to use the stretch-and-fold method. This method helps the gluten develop, which is what gives sourdough bread its signature chewy texture.
- To do the stretch-and-fold method, wet your hands and grab the dough from the bottom of the bowl. Stretch it upwards and fold it over itself. Rotate the bowl a quarter turn and repeat the process.
- Do this four times, so you've done a full rotation. Cover the bowl with a tea towel and let it rest for 30 minutes. Repeat the stretch-and-fold method three more times, with 30-minute rests in between each round.
Proofing and Shaping
- After the last stretch-and-fold, let the dough bulk ferment at room temperature overnight, for about 8-12 hours. This is called the bulk fermentation stage, and it allows the dough to rise. The timing might vary depending on the season and the temperature of the room.
- Lightly flour a clean surface and gently scrape the dough out of the bowl onto it. Make sure not to deflate the dough too much.
- Shape the dough into a ball by pulling the sides towards the center and pinching them together. Then, flip the dough over so that the smooth side is facing up.
- Place the dough into a glass bowl lined with a towel that's been dusted with rice flour, with the seam side facing up. You can also use a banneton basket dusted with rice flour.
- Cover the dough and let it proof for another 30 minutes to an hour, or until it has visibly risen and feels puffy.
Baking in a Dutch Oven
- While the dough is proofing, preheat your oven to 230° C (450° F) and place your Dutch oven inside to preheat as well.
- Place a long piece of parchment paper over the bowl with the dough. Flip the bowl over onto the countertop so that the dough is now on top of the parchment paper. The dough should hold its shape without collapsing.
- To help the dough expand evenly in the oven, use a sharp knife or a razor blade to score the top with a decorative pattern. You can score in the areas where you want the dough to puff up, preventing random cracking.
- With the help of parchment paper, gently transfer the dough into the preheated Dutch oven. Place a few ice cubes underneath the parchment to create steam and help the bread rise better.
- Put the lid back on and bake it for about 20 minutes.
- Take the lid off, reduce the temperature to 200℃ (390℉), and bake it for another 25-30 minutes, or until the crust is a beautiful golden brown and the bread sounds hollow when you tap it underneath.
- Take the bread out of the Dutch oven and let it cool on a wire rack for at least an hour before slicing and serving.
Video
Notes
- Make sure your sourdough starter is active, strong, well-fed, and at its peak with lots of bubbles.
- Use a digital kitchen scale to measure your ingredients accurately.
- The stretch and fold method helps the gluten develop, giving sourdough bread its signature chewy texture.
- Bulk fermentation might vary depending on factors such as the temperature, strength of the sourdough starter, and type of flour used. Warmer temperatures speed up fermentation, while colder temps slow it down. A strong starter works faster than a weaker one, and different flours ferment at different rates.
- To help the dough expand evenly in the oven, use a sharp knife or a razor blade to score the top with a decorative pattern.
- Preheat your Dutch oven before adding the bread dough to ensure even heat distribution.
- Let the bread cool completely before slicing to prevent it from becoming gummy.
- If you don't have a Dutch oven, you can use a baking stone or a cast iron skillet instead.
Nutrition
This post uses affiliate links. This means that if you click on them and then buy something, we get a small amount of commission to keep the site running, but it doesn’t cost you anything more.


Mark Hurd says
I tried this recipe yesterday and today and for the first time my sourdough came out well and actually had that distinctive sourdough taste. I made a double batch and baked the first in my Dutch oven and the second as a sandwich loaf in a bread tin. Both worked well. Thank you!
Ayla Clulee says
Hi Mark
Thanks for taking time to leave such a lovely comment!
I am so happy to hear that your sourdough bread turned out well. This is my go-to recipe that I often make and never disappoints me!
Chris says
The instructions were clear and easy to follow, and the resulting bread was out of this world. The crust was beautifully crispy and golden, with just the right amount of chewiness. The inside was soft and fluffy, with a wonderful tangy flavor that only sourdough bread can provide. Thank you for the recipe!
Ayla Clulee says
Dear Chris, I am so glad you liked the recipe, and thank you for your lovely comment!
Best wishes
Ayla