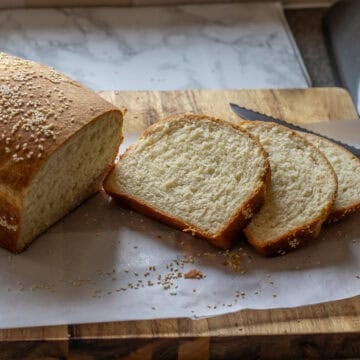
My Sandwich Bread Recipe is soft, fluffy, easy to slice, and perfect for everyday sandwiches, toast, soups, and freezer meal prep. It is made with simple ingredients, uses half white bread flour and half whole wheat bread flour, and only needs one main rise in the loaf pan before baking.

Jump to:
This is the perfect homemade bread recipe for beginners because the dough is easy to handle and the shaping is simple. I mix everything, let the dough rest for a short time, roll it into a log, place it in the loaf pan, and leave it to rise until it looks tall and puffy.
It bakes into a soft sandwich loaf with a light crumb, a mild whole wheat flavor, and slices that hold up well for packed lunches, toast, grilled cheese, or breakfast with butter and homemade Strawberry and Rhubarb Jam.

Why This Recipe Works?
- This is a simple one-rise bread recipe, so it is easier and quicker than many homemade sandwich bread recipes.
- The mix of white bread flour and whole wheat bread flour gives the loaf a soft texture with a little extra flavor.
- Butter keeps the crumb tender and helps make the bread softer.
- Honey feeds the yeast, adds a light sweetness, and helps the loaf stay fresh for longer.
- Rolling the dough into a rectangle and folding it into a log gives the bread a better shape and a more even crumb.
- The loaf slices well once cooled, making it perfect for sandwiches, toast, and freezing.
- You can make one loaf or double the recipe and freeze sliced bread for later.
Ingredients You'll Need
Please scroll down to the recipe card below for the full ingredients list with measurements, complete recipe method, recipe notes, and nutritional information.

- Flour - I use half white bread flour and half whole wheat bread flour. This gives the loaf a soft texture with a little extra flavor. You can use all white bread flour for a lighter loaf, but all whole wheat flour will make it denser.
- Yeast - Fast-action dry yeast works best because you can add it straight to the bowl with the other ingredients. You can also use ½ oz (15 grams) of fresh yeast, but mix it with the warm water and honey first and let it sit for 10 minutes before adding it to the flour.
- Honey - It gives the yeast something to feed on and adds a gentle sweetness to the bread. It also helps keep the crumb soft. You can replace it with sugar if you prefer.
- Butter - It adds flavor and helps create a soft, tender crumb. Use unsalted butter so you can control the salt in the dough. For a dairy free version, you can leave out the butter or use a mild olive oil. The texture will be slightly different, but the bread will still work.
- Water - Use warm water, around 105°F to 110°F, or 40°C to 43°C. The water should feel warm to the touch but not hot. If the water is too hot, it can damage the yeast. If it is too cold, the dough will rise more slowly.
- Salt - It is important in bread dough. It adds flavor and helps control the yeast. Without salt, the bread will taste flat, and the dough may rise too quickly.
How to Make Soft Sandwich Bread
Prepare the Dough
Place the flour, warm water, salt, honey, butter, and yeast in the bowl of a stand mixer. Mix with the dough hook on medium speed for 7 to 8 minutes, or until the dough looks smooth and pulls away from the sides of the bowl. The dough should feel soft and slightly tacky, but not wet. If it feels very sticky, add a little more flour, 1 tablespoon at a time. Try not to add too much flour, as this can make the bread dry and heavy.

Transfer the dough to a lightly floured surface and knead it by hand for a couple of minutes. Shape it into a ball, cover it with a clean kitchen towel, and let it rest for 15 minutes. This short rest helps the dough relax, which makes it easier to roll out.

Shape the Loaf
Lightly flour your work surface and roll the dough into a rectangle, about 10 x 14 inches, or 25 x 35 cm.

Starting from one of the shorter sides, roll the dough up tightly into a log. Try to keep the roll even as you go, and gently pinch the seam closed at the end. Tuck the ends slightly underneath so the loaf fits neatly in the pan.

Lightly oil a 5 x 10-inch, or 12 x 25 cm, loaf pan. Place the dough into the pan with the seam side facing down.

Let the Dough Rise
Cover the loaf pan with a damp kitchen towel or lightly oiled plastic wrap. Leave it in a warm place for 1 to 1½ hours, or until the dough rises well above the rim of the pan. The exact rising time depends on the temperature of your kitchen. A warm room will make the dough rise faster. A cooler room will slow it down. The dough is ready to bake when it looks tall, puffy, and almost tripled in size. If you gently press it with your finger, the indentation should spring back slowly.

Bake the Bread
Preheat your fan oven to 390°F, or 200°C. If using a conventional oven, use 400°F, or 205°C. Place the loaf pan in the hot oven and bake for 15 minutes. Lower the oven temperature to 360°F, or 180°C, and bake for another 15 minutes.
The bread is ready when the top is golden and the loaf sounds hollow when tapped. If you use a thermometer, the center of the loaf should be around 190°F, or 88°C.

Let the bread cool in the pan for 5 minutes, then remove it from the pan and place it on a wire rack. Let it cool completely before slicing.
Recipe Tips From the Chef
- Use warm water, not hot water. Water around 105°F to 110°F, or 40°C to 43°C, is best for yeast bread.
- Do not add too much extra flour. A slightly tacky dough gives you softer bread.
- Let the dough rest for 15 minutes before rolling. This makes shaping much easier.
- Roll the dough tightly so the loaf rises evenly and slices neatly.
- Place the dough seam side down in the loaf pan so it keeps its shape while rising.
- Let the loaf rise until it is tall and puffy before baking. Underproofed bread can turn out dense.
- Let the bread cool completely before slicing, as warm bread is very soft and can tear easily. I find it much easier to place the loaf in the freezer until slightly firm, then slice it with a serrated bread knife for cleaner, neater slices.
Storage
Store homemade sandwich bread in an airtight bag or bread box at room temperature for up to 3 days. Let the loaf cool completely before storing it, or steam can make the crust and crumb damp.
For longer storage, slice the bread and freeze it in a freezer bag. I like freezing it sliced because you can take out only what you need. Frozen slices can go straight into the toaster. If you want soft slices for sandwiches, place them on the counter for about 10 minutes until thawed.
Homemade bread does not contain the same preservatives as store bought bread, so freezing is the best option if you are not planning to eat the loaf within a couple of days.
Variations
You can make this sandwich bread with all white bread flour for a softer, lighter loaf. This is a good option if you want bread that feels closer to classic white sandwich bread.
For a heartier loaf, use a higher amount of whole wheat bread flour. Keep in mind that more whole wheat flour makes the bread denser, so the loaf may not rise as high.
For a dairy free sandwich bread, leave out the butter or replace it with mild olive oil. The bread will still be soft, but the flavor will be slightly different.
You can add seeds to the dough or sprinkle them on top before baking. Poppy seeds, sesame seeds, sunflower seeds, or oats all work well.
Serving Suggestions
This homemade sandwich bread is perfect for everyday packed lunches, toast, grilled cheese, egg sandwiches, tuna sandwiches, chicken sandwiches, and simple buttered toast.
It is also lovely served with soups and stews. Try it with Ezo Gelin Corbasi (Ezogelin Soup), Mediterranean Lentil Soup, Vegan Pumpkin Soup, or Red Pepper and Tomato Soup.
For breakfast, toast a slice and serve it with butter, honey, jam, or eggs. It also works well with Kuymak (Mihlama), Spinach With Eggs, or a simple cheese plate.
You can use slightly stale slices for French toast, bread pudding, croutons, breadcrumbs, or toasted sandwich melts.
Recipe FAQs
Yes, you can knead the dough by hand. Mix the ingredients in a large bowl until a rough dough forms, then knead on a lightly floured surface for about 10 minutes. The dough should become smooth, stretchy, and slightly tacky.
Let the bread cool completely before slicing. For very neat slices, place the cooled loaf in the freezer for about 1 hour, or until it feels slightly firm but not frozen solid. Slice it with a serrated bread knife.
Dense bread is usually caused by too much flour, under kneading, underproofing, old yeast, or water that was too hot or too cold. The dough should be soft and slightly tacky, and it should rise until tall and puffy before baking.
Yes, you can double the flour, water, salt, and yeast to make two loaves. You do not need to fully double the honey and butter. Use about 20 g / ¾ oz of honey and 20 g / ¾ oz of butter for two loaves.
Related Recipes
For more delicious Homemade Bread Recipes why not try:


Did you make this recipe? Please let me know how it turned out! Leave a comment below and tag @cookingorgeous on Instagram and hashtag it #cookingorgeous.
I hope you enjoy the process of making this easy Homemade Soft Sandwich Bread as much as you enjoy eating it! 🙂
Want to Save This Recipe?
Enter your email & I'll send it to your inbox. Plus, get great new recipes from me every week!
By submitting this form, you consent to receive emails from Cooking Gorgeous

Sandwich Bread Recipe
Ingredients
- 4 ¼ cups bread flour (half white, half wholemeal) (500 grams/17½ oz)
- 1 ¼ cups tepid water (300 ml/10 fl oz)
- 1 ½ teaspoon salt (10 grams/⅓ oz)
- ¾ tablespoon honey (15 grams/½ oz)
- 1 tablespoon unsalted butter (15 grams/½ oz)
- 2 teaspoon fast action dry yeast (7 grams/¼ oz)
Instructions
- Place the flour, warm water, salt, honey, butter, and yeast in the bowl of a stand mixer.
- Mix with the dough hook on medium speed for 7 to 8 minutes, or until the dough looks smooth and pulls away from the sides of the bowl.
- Transfer the dough to a lightly floured surface and knead it by hand for 2 to 3 minutes.
- Shape the dough into a ball, cover it with a clean kitchen towel, and let it rest for 15 minutes. This makes the dough easier to roll and shape.
- Lightly flour your work surface and roll the dough into a rectangle, about 10 x 14 inches, or 25 x 35 cm.
- Starting from one of the shorter sides, roll the dough up tightly into a log. Pinch the seam closed and tuck the ends slightly underneath.
- Lightly oil a 5 x 10 inch, or 12 x 25 cm, loaf pan.
- Place the dough into the loaf pan with the seam side facing down. Cover with a damp kitchen towel or lightly oiled plastic wrap.
- Let the dough rise in a warm place for 1 to 1½ hours, or until it is tall, puffy, and well risen above the rim of the pan.
- Preheat your fan oven to 390°F, or 200°C. For a conventional oven, use 400°F, or 205°C.
- Bake the bread for 15 minutes, then lower the oven temperature to 360°F, or 180°C. Bake for another 15 minutes.
- Remove the pan from the oven and let the bread cool in the pan for 5 minutes.
- Transfer the loaf to a wire rack and let it cool completely before slicing.
Video
Notes
- Use warm water around 105°F to 110°F, or 40°C to 43°C. It should feel warm, not hot.
- The dough should be soft and slightly tacky. Avoid adding too much flour.
- If the dough does not roll easily, cover it and let it rest for another 5 minutes.
- This recipe makes about 14 thick slices, 16 medium slices, or 18 thin slices.
- For neat slices, cool the loaf completely before cutting. You can also chill it in the freezer for about 1 hour until slightly firm, then slice with a serrated bread knife.
- Store at room temperature for up to 3 days, or freeze sliced bread for up to 3 months.
- Frozen slices can go straight into the toaster.
- You can add poppy seeds, sesame seeds, sunflower seeds, or oats on top before baking.
- For fresh yeast, use 15 g / ½ oz fresh yeast. Mix it with the warm water and honey first, then leave it for about 10 minutes before adding it to the flour.
- To double the recipe, double the flour, water, salt, and yeast. Use about 20 g / ¾ oz of honey and 20 g / ¾ oz of unsalted butter for two loaves.


Kaye says
How can I cut this down to fit a 9x5 pan ?
Ayla Clulee says
Hi Kaye,
You can fit the dough in a 9" x 5" pan without cutting it down. Simply roll the dough out into a large rectangular shape size of 22cm x 35cm (9" x 14"), which is slightly shorter than stated in the recipe.
Hope that helps.
Kaye says
Thank you!
Alina says
The shape and texture of this loaf is absolutely perfect!
Celine says
I made it. Im over the moon thrilled with how it came out. my first yeast bread, first time, first try and its AMAZING. so happy. Thank you!
Melis says
Thank you for this recipe. I was nervous to try making this type of bread, but it came out great the first time! It won’t be the last!
Irene says
Hi, there is no need to proof the dough 2 times?
Once is enough?
Thanks
aylaclulee says
Hi Irene
There is no need for second proofing. Make the dough, shape it and let it proof in a warm place until it triples the size.
Hope that helps.
Please let me know how it turns out for you 🙂
Thanks
Ayla
mae says
Can I use all purpose flour or bread flour for this?
Ayla Clulee says
Hi Mae
Yes, you can definitely use bread flour for this recipe.
Hope that helps.
Ayla
Sabene says
I have made this several times and it’s now my go-to bread. Super easy, super delicious, and I always get compliments! Thanks for this amazing recipe!!
aylaclulee says
Hi Sabene
Thank you! 😊