If you’ve ever wondered how to make homemade Greek yogurt, you’re in the right place! It’s one of those things that seems tricky until you try it once. All you need is milk, a bit of yogurt, and some quiet time on the counter. You heat the milk, cool it down, stir in your starter, and leave it somewhere warm. A few hours later, you’ll have thick, creamy plain yogurt with a fresh, clean taste.
Jump to:
Greek yogurt is just regular plain yogurt that’s been strained, so it loses some of its liquid and gets rich and smooth. The taste is tangy but not sharp, smooth enough to eat on its own and rich enough to pair with fruit, honey, or savory dishes. Making it at home lets you choose how thick or tart you like it without any added thickeners or preservatives. Yogurt is a staple in my kitchen, especially for Turkish and Mediterranean recipes.

The best part is that it’s simple to fit around your day. You don’t need special tools, just a pot, a spoon, and something to keep it warm while it sets. Once you’ve made it once, you start to see how easy it is to keep a steady batch going week after week.
What You’ll Need
Please scroll down to the recipe card below for the full ingredients list with measurements, complete recipe method, recipe notes, and nutritional information.

To make a delicious homemade yogurt, you need just two ingredients: milk, and live culture. The quality of the milk and the health of your starter determine most of your final texture and flavor.
Milk Choices
Whole milk makes the creamiest, richest yogurt. It has enough fat and protein to create a dense, velvety texture once strained. Two-percent milk works fine, though the result is lighter. Skim milk produces a thinner, looser yogurt that can still taste good but lacks body.
You can use pasteurized or raw milk, but raw milk should always be heated first for safety. Non-dairy milks need different cultures, so they’re another story entirely.
Yogurt Starter
Your “starter” is just plain yogurt that already contains live active cultures. These bacteria convert lactose (milk sugar) into lactic acid, thickening and souring the milk. Use plain, natural, unsweetened yogurt, ideally full-fat, and check the label for “live and active cultures.”
For each liter (about a quart) of milk, use two to three tablespoons of starter yogurt. More isn’t always better, as too much can make the texture grainy. If you plan to make yogurt regularly, you can save a bit from each batch to use as your next starter. After about eight to ten generations, it’s best to refresh with a new store-bought yogurt, since older cultures lose strength over time.
Tools You Need (and Nothing More)
You don’t need to invest in any gadgets. A few household items do the job perfectly:
- A heavy-bottomed pot to heat your milk evenly
- A thermometer, digital or instant-read
- A towel or blanket to insulate during incubation
- A fine-mesh strainer or colander
- Cheesecloth, clean muslin, or a thin cotton towel for straining
If you have an Instant Pot or a yogurt maker, great, they’ll make temperature control easier. But if not, your oven light or a wrapped towel method works just as well.
How to Make Homemade Greek Yogurt
Heat the Milk
Pour your milk into a heavy pot and warm it gently over medium heat. Stir now and then to keep the bottom from scorching. When the temperature reaches about 185°F (85°C), which is just below boiling, you’ll see small bubbles forming at the edges. Hold it there for a minute or two.
This step changes the milk proteins so the yogurt thickens smoothly instead of curdling. Think of it as setting the stage for your culture to do its work.
Cool It Down
Take the pot off the heat and let it cool to 110°F–115°F (43°C–46°C). Too hot and it’ll kill the live bacteria; too cool and they’ll barely grow. Stir gently to release trapped heat, or set the pot in a sink filled with cool water to speed things up.
Add the Starter
Bring your starter to room temperature. In a small bowl, mix a few spoonfuls of the warm milk with your starter yogurt until smooth.

Then pour it back into the pot and whisk gently. This “tempering” helps blend the cultures evenly without shocking them. Cover the pot loosely with a lid.
Incubate
Now, the quiet part. The milk needs to stay warm, around 110°F (43°C), for 6 to 12 hours. The longer it sits, the tangier the flavor. Six hours gives you mild yogurt; twelve hours gives you something sharper and more complex.
To keep it warm:
- Wrap the covered pot in towels and set it in the oven with the light on, or

- Use a yogurt maker or Instant Pot, or
- Place it in an insulated cooler with a warm water bottle inside.
During this time, don’t stir or move it. Just let the bacteria work. After about six hours, you can gently check, and if it looks set and jiggles slightly, it’s ready.
Chill and Rest
Once it’s thickened, remove the lid and refrigerate the whole pot (still untouched) for at least 6 hours, or overnight. This allows it to firm up and develop flavor.
Strain to Make It “Greek”
Line a strainer with cheesecloth or a clean towel and set it over a bowl. Spoon the chilled yogurt into it. Let it drain in the fridge for 2 to 8 hours, depending on how thick you like it.

- Two hours: creamy but still light
- Four to six hours: classic Greek style
- Eight hours or more: dense, almost like cream cheese
Don’t toss the liquid (the whey) that collects underneath; it’s full of protein and nutrients. You can use it in smoothies, bread dough, or soups.
Store It
Scoop your strained yogurt into airtight containers or glass jars and keep them refrigerated. It’ll stay fresh for 7 to 14 days. Keep back a few tablespoons as your starter for the next batch.
Recipe Tips For the Perfect Yogurt
- Warm your starter to room temperature before using; it helps the bacteria wake up faster.
- Don’t skip the heating step; it’s what makes the texture smooth.
- Keep your incubation temperature steady. Sudden drops make yogurt thin and watery.
- Be patient during straining; letting gravity do the work yields better texture than squeezing.
- Save your whey, it’s great for pancakes, bread dough, or as a protein boost in smoothies.
- Label jars with the date you made the batch so you can track freshness and starter generations.
How to Store Homemade Greek Yogurt
Plain Greek yogurt keeps well in the fridge for up to two weeks if sealed tightly. Always use a clean spoon when scooping to avoid contamination. If you see a thin layer of whey on top, that’s normal; just stir it back in or pour it off.
If you’re reusing yogurt as a starter, try to use it within five to seven days of making the batch, as it’s when the cultures are most active.
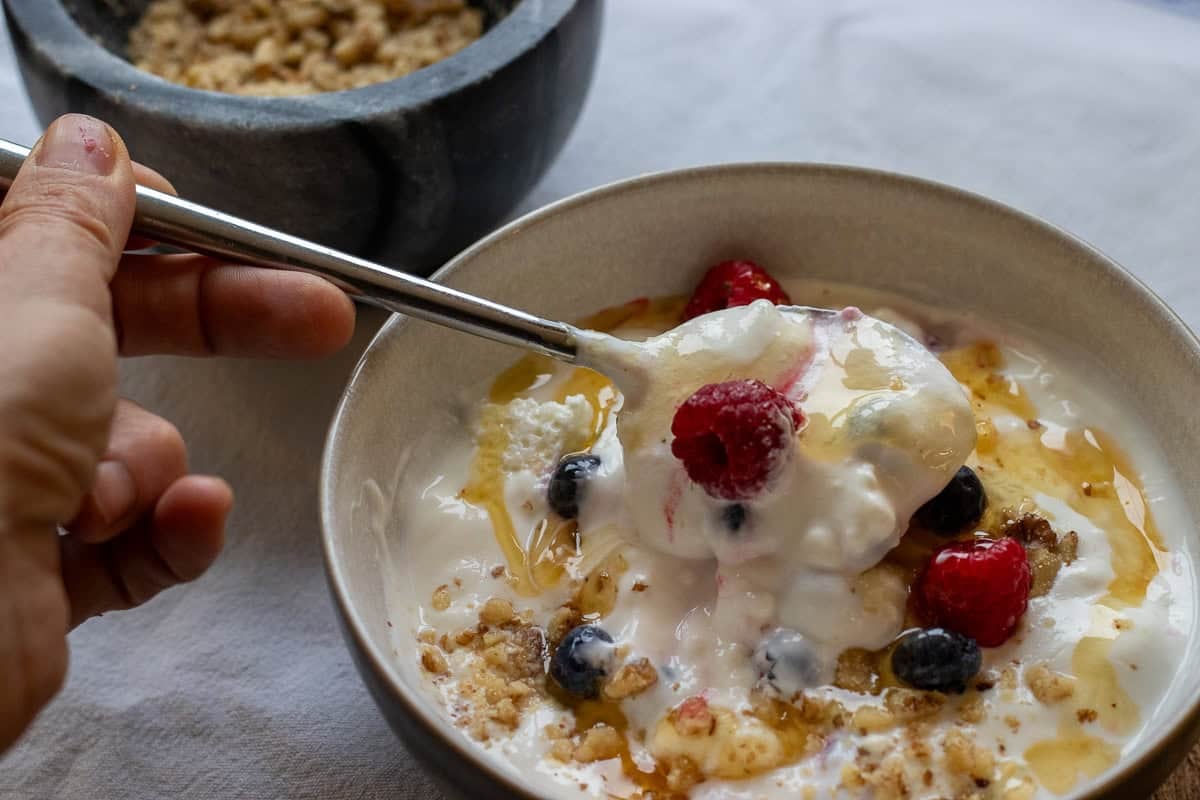
Serving Ideas
Homemade Greek yogurt is versatile. It fits easily into both sweet and savory meals. Our favourite way to eat it is with honey, fruit, and a sprinkle of nuts for a simple breakfast. I also use it for making Cacik (Turkish Yogurt Dip) with grated cucumber, and fresh herbs. Other ways to use Greek yogurt is:
- Mix it into marinades for Easy Greek Chicken Marinade with Yogurt or lamb; the acidity tenderises beautifully.
- Swap it for sour cream in dips or baked potatoes.
- Stir into Yayla Corbasi - Turkish Yogurt Soup to add creaminess without heaviness.
- Serve it along Mediterranean dishes such as Chicken Couscous, Turlu - Roasted Vegetables, or Turkish Pasta with Ground Beef.
Once you get used to having homemade yogurt around, it sneaks into nearly everything, sauces, dressings, desserts, and quick snacks.
Troubleshooting
Yogurt didn't set or runny: Usually this happens because of a low incubation temperature or a weak starter. Make sure your pot stays warm enough and use a fresh culture next time. Fixing it is simple. Reheat your oven (no fan) to 75°C (167°F), place your yogurt pot inside uncovered, close the oven door, and leave it untouched for one hour. Then open the oven door and let the yogurt cool for about 15 minutes before moving it to the fridge. It might still look a bit runny, but once it chills it will set nicely. Keep it in the fridge for 5 to 6 hours and then close the lid of the yogurt pot.
Grainy texture: Happens when milk overheats or is whisked too vigorously. Heat gently and avoid heavy stirring after adding the starter.
Too tangy: That just means it fermented too long. Next batch, shorten the incubation to six or seven hours.
Not tangy enough: Extend the time or use a more active starter. Temperature consistency matters here, too.
Watery separation after chilling: Normal in small amounts, just stir back in. If excessive, your starter may be weak, or the yogurt wasn’t fully set before refrigeration.
Culture fatigue: If your yogurt loses its usual thickness after several batches, it’s time for a new starter. Strains can weaken or shift after many uses.
Recipe FAQs
You could, but the texture might turn out thin or uneven. Heating reshapes milk proteins, giving the yogurt body and smoothness.
Yes. Use the “Yogurt” function, which maintains the right temperature for incubation. You can heat, culture, and strain all in the same pot.
You can usually reuse the same culture five to ten times before it weakens. After that, start again with a new live-culture yogurt from the store for best texture and taste.
Related Recipes
For delicious recipes you can make with homemade yogurt, why not try:


Did you make this recipe? Please let me know how it turned out! Leave a comment below and tag @cookingorgeous on Instagram and hashtag it #cookingorgeous.
I hope you enjoy the process of making Homemade Greek Yogurt as much as you enjoy eating it! 🙂
Bon appétit! / Afiyet olsun!
Want to Save This Recipe?
Enter your email & I'll send it to your inbox. Plus, get great new recipes from me every week!
By submitting this form, you consent to receive emails from Cooking Gorgeous

How to Make Homemade Greek Yogurt
Equipment
- 1 Measuring cups
- 1 heavy-bottom stockpot
- 1 sieve
- 1 cheesecloth
Ingredients
- 1 l full fat milk (whole milk)
- 2½ tablespoon Greek yogurt
Instructions
Heating the Milk
- Pour your milk into a heavy pot and warm it gently over medium heat. Stir now and then to keep the bottom from scorching.
- When the temperature reaches about 185°F (85°C)—just below boiling—you’ll see small bubbles forming at the edges. Hold it there for a minute or two.
- This step changes the milk proteins so the yogurt thickens smoothly instead of curdling. Think of it as setting the stage for your culture to do its work.
Cooling it Down
- Take the pot off the heat and let it cool to 110°F–115°F (43°C–46°C). Too hot and it’ll kill the live bacteria; too cool and they’ll barely grow.
- Stir gently to release trapped heat, or set the pot in a sink filled with cool water to speed things up.
Adding the Starter
- In a small bowl, mix a few spoonfuls of the warm milk with your starter yogurt until smooth.
- Then pour it back into the pot and whisk gently. This “tempering” helps blend the cultures evenly without shocking them.
- Cover the pot loosely with a lid.
Incubating
- Now, the quiet part. The milk needs to stay warm—around 110°F (43°C)—for 6 to 12 hours. The longer it sits, the tangier the flavor. Six hours gives you mild yogurt; twelve hours gives you something sharper and more complex.
- To keep it warm: Wrap the covered pot in towels and set it in the oven with the light on, or use a yogurt maker or Instant Pot, or place it in an insulated cooler with a warm water bottle inside.
- During this time, don’t stir or move it. Just let the bacteria work. After about six hours, you can gently check; if it looks set and jiggles slightly, it’s ready.
Chilling and Resting
- Once it’s thickened, remove the lid, and refrigerate the whole pot (still untouched) for at least 6 hours, or overnight. This allows it to firm up and develop flavor.
Straining to Make It “Greek”
- Line a strainer with cheesecloth or a clean towel and set it over a bowl. Spoon the chilled yogurt into it.
- Let it drain in the fridge for 2 to 8 hours, depending on how thick you like it. Two hours: creamy but still lightFour to six hours: classic Greek styleEight hours or more: dense, almost like cream cheese
- Don’t toss the liquid that collects underneath; it’s whey, and it’s full of protein and nutrients. You can use it in smoothies, bread dough, or soups.
- Scoop your strained yogurt into airtight containers or glass jars and keep them refrigerated. It’ll stay fresh for 7 to 14 days.
- Keep back a few tablespoons as your starter for the next batch.
Notes
- Warm your starter to room temperature before using; it helps the bacteria wake up faster.
- Don’t skip the heating step; it’s what makes the texture smooth.
- Keep your incubation temperature steady. Sudden drops make yogurt thin and watery.
- Be patient during straining; letting gravity do the work yields better texture than squeezing.
- Save your whey, it’s great for pancakes, bread dough, or as a protein boost in smoothies.
- Label jars with the date you made the batch so you can track freshness and starter generations.


Natalie says
This guide made homemade yogurt feel simple. The result was thick, creamy, and very good.