
Boyoz is a flaky Turkish pastry from Izmir with thin layers, a crisp golden outside, and a soft centre. It is usually eaten for breakfast with hard-boiled eggs, plenty of black pepper, and a glass of Turkish Tea -Cay.
This homemade boyoz recipe uses a simple yeast-free dough. The dough needs time to rest, but the ingredients are basic and the shaping is easier once you understand how the dough should feel.

Jump to:
Traditional bakery boyoz is often made with plenty of oil. This version uses softened butter between the layers, so you still get a flaky pastry without soaking the dough in oil overnight.
What is Boyoz?
Boyoz is a small, round pastry closely linked with Izmir on Turkey’s Aegean coast. Its roots go back to the Sephardic Jewish community that settled in the Ottoman Empire after leaving Spain and Portugal.
The name comes from the Ladino word boyos, related to the Spanish word bollos. It refers to small buns or pastries.

Traditional boyoz is yeast-free and made from thin layers of dough. Older versions used sesame oil, while many modern bakeries use sunflower oil. Plain boyoz is the version most commonly sold in Izmir. Cheese, spinach, aubergine, potato, and tahini-filled varieties are also available.
In Izmir, boyoz is often bought from bakeries or street stalls early in the morning. The classic way to eat it is with hard-boiled eggs and Turkish tea.
Why This Recipe Works?
- Many traditional boyoz recipes use a lot of oil and long resting times. This version keeps the flaky layers but uses softened butter, so the dough is easier to manage at home.
- The pastry has a crisp outside and a soft middle. It is plain, but not dry or boring. The flavour comes from the buttery layers and the way the dough bakes.
- The resting time does real work. It relaxes the dough, so you can roll and stretch it without fighting it at every step.
- This is a great recipe if you want something different from bread rolls, pogaca, or borek. It still fits perfectly on a Turkish breakfast table, especially with boiled eggs and tea.
- The pastries also reheat well. The outside crisps up again in the oven, so leftovers are still worth keeping for the next day.
Ingredients You'll Need
Please scroll down to the recipe card below for the full ingredients list with measurements, complete recipe method, recipe notes, and nutritional information.

- Flour - Strong white bread flour works best. It gives the dough enough strength to stretch thinly. Plain flour or all-purpose flour can work, but the dough may feel softer and tear more easily.
- Water - Use tepid water. It should not feel hot, or the dough can become too soft.
- Salt - The dough needs salt for flavour. Without it, the pastries taste flat.
- Butter - Use softened unsalted butter. It should spread easily but should not be melted.
- Vegetable oil - Use a neutral oil for brushing the dough and stopping the surface from drying out. Sunflower oil also works well.
How to Make Izmir Boyoz
Prepare the Dough
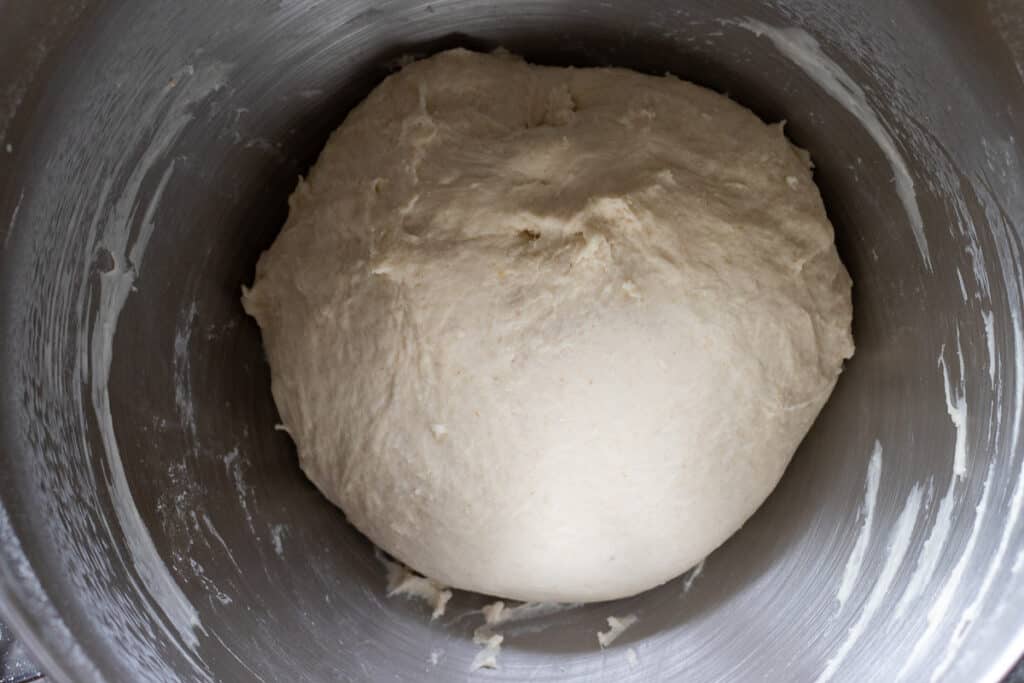
Mix the flour, salt, and sugar in the bowl of a stand mixer. Add the water gradually while mixing. Keep mixing until the dough comes together and pulls away from the bowl.
Knead the dough in the mixer, then transfer it to a lightly floured surface. Knead by hand until smooth and elastic. Divide the dough into 6 equal pieces and shape them into balls. Cover and let them rest.

Shape the Dough
Take 3 of the rested dough balls. Roll each one on a lightly floured surface into a circle measuring about 15 cm / 6 inches across. Each circle should be about the size of a small side plate.
Divide the softened butter evenly between the 3 circles. Use about 1 generous tablespoon on each. Spread the butter into a thin, even layer. Leave a border of about 1 cm / ½ inch clear around the edge. Butter on the border can stop the top and bottom pieces from sealing.

Roll the remaining 3 dough balls into circles of the same size. Place one plain circle on top of each buttered one. Line up the edges, then press firmly all the way around with your fingertips. You should now have 3 sealed, double-layered circles with butter inside.
Brush the top of one circle lightly with vegetable oil. Place it oiled-side down on a plate, then brush the other side.

Repeat with the remaining circles. Cover the plate tightly with plastic wrap and rest the dough for 50 minutes.
Stretch the Dough
Lightly oil a large, clean worktop. Do not use flour at this stage, as oil allows the dough to stretch more easily.
Place one layered circle on the oiled surface. Press it gently with your palms to make it wider. Start stretching from the edges. Lift one section at a time and pull it out gently. Work your way around the dough instead of pulling hard from one spot.
Continue until the dough is very thin and almost translucent. You should be able to see the worktop through most of it. Small tears are not a problem. They will be covered when the dough is folded. If the outer edge remains thick, stretch it again or trim away any very heavy pieces.

If the dough keeps shrinking back, stop and cover it for another 10 to 15 minutes. It needs more time to relax.
Fold and Roll
Fold the top edge of the stretched dough towards the centre. Bring the bottom edge up and over it.
Fold the left and right sides towards the centre to form a neat square or rectangle. Starting from one short side, roll the folded dough into a firm cylinder. Do not squeeze it tightly enough to crush the layers.


Repeat the stretching, folding, and rolling with the other 2 circles. You should have 3 logs. Cover the logs with plastic wrap and let them rest for 30 minutes.
Shape the Pastries
Use a sharp knife or dough cutter to divide each log into 4 equal pieces. You should have 12 pieces in total, each weighing about 50 g / 1¾ oz. Try to cut straight down rather than using a sawing motion. This helps keep the layers visible. Stand one piece upright with a cut side facing up. Press the centre gently with your fingertips while tucking the outer edges underneath.
Shape it into a small, thick round. Do not flatten it into a thin disc. The layers need some height to open while baking.
Repeat with the remaining pieces.


Arrange the pastries on a large baking tray lined with parchment paper. Leave a little space between each one.
Cover loosely with plastic wrap and rest for 50 to 60 minutes. They will relax and spread slightly, but they will not double in size because the dough contains no yeast.

Preheat the oven to 200°C / 390°F.
Bake for 20 to 25 minutes. Check the bottoms as well as the tops. The pastries are ready when both sides are a good golden brown.
Pale boyoz can remain heavy and doughy inside, so give them enough time to colour.

Move the baked pastries to a wire rack and leave them for a few minutes. Serve while they are still warm.
How Long Does Boyoz Take?
Boyoz takes about 3 hours and 15 minutes from start to finish. Only around 25 minutes is active preparation.
The dough rests for 20 minutes after dividing, 50 minutes after layering, 30 minutes after rolling, and 50 to 60 minutes after the final shaping.
Baking takes 20 to 25 minutes at 200°C / 390°F.
Do not shorten the rests to save time. The dough becomes easier to stretch after each one. Rushing can leave you with dough that springs back or tears before it is thin enough.
Recipe Tips From the Chef
- Use a kitchen scale to divide the dough into 6 equal balls. Even pieces are easier to pair and give you pastries that bake at the same rate.
- The dough should not be sticky before its first rest. Sticky dough cannot be stretched into a thin sheet without clinging to your hands and the worktop.
- Do not keep adding flour to a well-kneaded dough just because it feels soft. Too much flour can leave the finished pastries hard.
- Butter should be soft enough to spread without tearing the circles. Melted butter can leak from the edges and make the dough difficult to seal.
- Use oil rather than flour when stretching. Flour dries the surface and can stop the layers from opening properly.
- Stretch from several points around the edge. Pulling from one place puts too much pressure on a small area and causes larger holes.
- Tiny tears will disappear once the sheet is folded. Thick, unstretched edges are more likely to leave dense patches in the finished pastry.
- The final shaped pieces should stay fairly thick. Pressing them flat can squash the layers before they reach the oven.
- Look at the underside before removing the tray. A golden top with a pale base can still mean the centre needs more time.
Adding a Filling
Plain boyoz is the version most often served in Izmir, but you can add a filling if you prefer.
Add it after stretching the dough and before folding it into a square. Spread a very thin layer over the dough, leaving the edges clear.
Choose a smooth filling that is not watery. Crumbled white cheese, a thin smear of tahini, olive paste, or well-cooked mushroom duxelles can work.
Avoid using too much. A heavy or wet filling can tear the sheet and stop the layers from baking properly.
How to Serve Boyoz
Boyoz is best served warm, while the outside is still crisp.
In Izmir, it is traditionally eaten with hard-boiled eggs sprinkled with salt and plenty of black pepper. A glass of Turkish Tea - Cay is served alongside.
You can also add Turkish white cheese, Zeytoon Parvardeh - Persian Marinated Olive, tomatoes, cucumber, honey, Strawberry and Rhubarb Jam, or Kaymak.
For a larger Turkish breakfast, serve it with Fried Halloumi, Menemen, Turkish Eggplant Salad, or Air Fryer Boiled Eggs.
Storage, Freezing, and Reheating
Let baked pastries cool completely before storing them. Keep them in an airtight container at room temperature for up to 2 days.
Reheat them at 180°C / 356°F for 5 to 7 minutes. The oven brings back the crisp outside better than the microwave.
Baked boyoz can be frozen for up to 3 months. Wrap each one well and place them in a freezer bag or container.
You can also freeze the shaped pastries before their final rest. Freeze them on the tray until firm, then transfer them to a freezer bag.
Thaw unbaked pastries in the fridge overnight. Place them on a lined tray, cover, and let them rest at room temperature before baking.
Recipe FAQs
Yes. Mix the dough in a large bowl, then knead it firmly by hand for about 20 minutes. It should become smooth, elastic, and no longer sticky.
It has not rested long enough. Cover it and leave it for another 10 to 15 minutes before trying again.
The dough may have been left too thick during stretching. Flattening the final pieces too much can also crush the layers. Check that the pastries are well browned underneath before removing them from the oven.
Spread a thin layer over the dough after stretching and before folding it into a square. Keep the filling smooth, dry, and light.
Related Recipes
For more delicious and authentic Turkish street food recipes why not try:


Did you make this recipe? Please let me know how it turned out! Leave a comment below and tag @cookingorgeous on Instagram and hashtag it #cookingorgeous.
I hope you enjoy the process of making this popular street food Boyoz Pastry Recipe as much as you enjoy eating it! 🙂
Want to Save This Recipe?
Enter your email & I'll send it to your inbox. Plus, get great new recipes from me every week!
By submitting this form, you consent to receive emails from Cooking Gorgeous

Turkish Boyoz Pastry
Ingredients
- 3 cups strong white bread flour (370 grams)
- 1 cup tepid water (240 ml)
- 1 teaspoon salt
- 1 teaspoon sugar
- 4 tablespoon unsalted butter, softened at room temperature (56 g)
- 1 tablespoon vegetable oil or sunflower oil, plus more if needed for the worktop (15 ml)
Instructions
Prepare the Dough
- Place the flour, salt, and sugar in the bowl of a stand mixer. Mix briefly to combine.
- Run the mixer on low and add the tepid water gradually. Continue mixing until the dough comes together and pulls away from the bowl.
- Knead with the dough hook for 10 minutes.
- Transfer the dough to a lightly floured worktop and knead by hand for another 10 minutes. It should be smooth, elastic, and no longer sticky.
- Divide the dough into 6 equal pieces, about 100 g / 3½ oz each. Shape them into balls, cover tightly, and rest for 20 minutes.
Shape the Dough
- Roll 3 dough balls into circles measuring about 15 cm / 6 inches across.
- Divide the softened butter evenly between the 3 circles, using about 1 generous tablespoon on each. Spread it thinly and leave a 1 cm / ½ inch border clear.
- Roll the remaining 3 balls to the same size. Place one over each buttered circle and press firmly around the edges to seal.
- Brush both sides of each layered circle lightly with oil. Stack them on a plate, cover, and rest for 50 minutes.
Stretch the Dough
- Lightly oil a large worktop. Stretch one circle gently from the edges until it is very thin and almost translucent. Small tears are fine.
- Fold all four sides towards the centre to make a square or rectangle. Roll it from one short side into a cylinder.
- Repeat with the remaining 2 circles. Cover the 3 logs and rest for 30 minutes.
Shape the Pastries and Bake
- Cut each log into 4 equal pieces to make 12 pieces in total. Each piece should weigh about 50 g / 1¾ oz.
- Stand each piece with a cut side facing up. Press the centre gently and tuck the edges underneath to form a small, thick round.
- Arrange the pastries on a lined baking tray. Cover and rest for 50 to 60 minutes. They will relax but will not double in size.
- Preheat the oven to 200°C / 390°F. Bake for 20 to 25 minutes, until the tops and bottoms are golden brown.
- Transfer to a wire rack and serve warm.
Video
Notes
- The dough must be smooth and non-sticky before it is divided. Sticky dough will be difficult to stretch thinly.
- Use a kitchen scale for the 6 dough balls and 12 final pieces. Even portions are easier to shape and bake more evenly.
- Use softened butter rather than melted butter. Divide it evenly between the 3 circles and leave the edges clean.
- Stretch the dough on an oiled surface until it is almost translucent. Small tears are fine, but thick edges can leave dense patches.
- Do not flatten the final pieces into thin discs. Keep them thick enough to protect the layers.
- The pastries will not double during the final rest. The rest relaxes the shaped dough before baking.
- Bake until the bottoms are golden as well as the tops. Pale pastries can remain doughy in the centre.
- For filled boyoz, add a thin, dry filling after stretching and before folding the dough.
- Store baked boyoz at room temperature for up to 2 days. Reheat at 180°C / 356°F for 5 to 7 minutes.
- Baked boyoz can be frozen for up to 3 months. Wrap each one well and place them in a freezer bag or container.


SallyBR says
I am so fascinated by this recipe... I would love to try it and maybe add a filling - in which step would I add it? when you roll to make the cylinders? I imagine the filling will have to be very delicate and smooth not to tear the pastry too much
maybe just a little smear of tahini? would a little mushroom duxelles work? any ideas?
thank you so much, just subscribed to your new posts, looking forward to them!
Ayla Clulee says
Hi Sally,
I'm glad you're excited about trying the recipe! Adding a filling is a great idea to personalize it.
You should add the filling after you've stretched the dough but before shaping it into cylinders. While it's not very common to use fillings, options like cheese, olive paste, pesto, jam, or tahini can be great choices. I'm confident that a small amount of mushroom duxelles would also work beautifully.
Best wishes
Ayla x
Celine says
This was so easy and delicious, especially with the video!