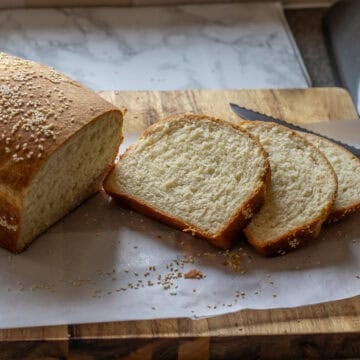
My Braided Bread Recipe is based on Swiss Butterzopf, also known as Zopf, a soft loaf made with flour, milk, butter, and yeast. It has a tender crumb, a golden, shiny crust, and a beautiful three-strand braid that gives the loaf a homemade look effortlessly.

This bread is traditionally served for breakfast or brunch in Switzerland, often with butter, jam, honey, cheese, or cold cuts. It is not a sweet bread like challah or Paskalya Coregi (Tsoureki) - Easter Bread, so it works just as well with savory toppings as it does with something sweet.
Jump to:
I love this recipe because the dough is simple, easy to handle, and made with everyday ingredients. Once you learn how to braid the dough, it becomes a lovely homemade bread to make for weekends, family breakfasts, or a weekend brunch table.
What Is Braided Bread?
Braided bread is a yeast bread shaped by dividing the dough into ropes and weaving them together before baking. It can be made with different types of dough, from simple white bread to rich egg-based loaves.
This recipe is a Swiss-style braided bread called Butterzopf or Zopf. The dough is made with milk and butter, which gives it a soft texture and a gentle richness. It is finished with egg yolk before baking to give the crust a deep golden color and shine.
Unlike sweeter braided breads, this loaf has only a small amount of sugar. The flavor is mild, buttery, and slightly savory, which makes it very versatile. You can serve it for breakfast, brunch, lunch, or alongside soups and salads.
Some versions use special Swiss Zopf flour, which is often a mix of white flour and spelt flour. For this homemade version, all-purpose flour works well and keeps the recipe easy to make.
Why This Recipe Works
- The dough is easy to handle because it is soft but not sticky, so rolling it into ropes and braiding it feels manageable even if you have not made braided bread before.
- Milk and butter give the loaf a tender crumb without making it rich or sweet like brioche or challah.
- The short ingredient list keeps the recipe simple while still giving you a soft, golden bread that works for breakfast, brunch, or sandwiches.
- The first rise builds structure, and the second rise keeps the braid light, so the loaf bakes up soft instead of dense.
- It is versatile enough for sweet and savory toppings, from butter and jam to cheese, eggs, cold cuts, or smoked salmon.
Ingredients You'll Need
Please scroll down to the recipe card below for the full ingredients list with measurements, complete recipe method, recipe notes, and nutritional information.

- All-purpose flour - It gives the bread structure and a soft texture. You can also use a mix of white flour and spelt flour if you want a slightly more traditional Swiss-style loaf, but plain all-purpose flour works perfectly well.
- Unsalted butter - Butter gives this braided bread its soft texture and light buttery flavor. Melt it gently, then mix it with cold milk so the liquid becomes lukewarm before adding it to the flour.
- Yeast - Fast-action dried yeast can be mixed straight into the flour. If you use active dry yeast, stir it into the warm milk with the sugar first and let it sit for 5 to 10 minutes until foamy.
- Milk - Milk adds moisture and helps create a tender crumb. Whole milk gives the richest result, but 2% milk also works well.
How to Make Braided Bread
Prepare the Dough
Melt the butter in a small saucepan over low heat. Remove it from the heat, then add the cold milk. The mixture should feel lukewarm, not hot. If it is too hot, leave it for a few minutes before using it.
If you are using active dry yeast, stir it into the warm milk mixture with the sugar and leave it for 5 to 10 minutes, until it starts to foam. If you are using fast-action dried yeast, you can add it straight to the flour.

Place the flour and salt in the bowl of a stand mixer fitted with a dough hook. Give it a quick mix. Pour in the milk mixture and start mixing on low speed.

Once the flour starts coming together, increase the speed to medium and knead for 8 to 10 minutes. The dough should become smooth, soft, and slightly tacky, but it should not stick heavily to your hands.

First Rise
Remove the dough from the bowl and shape it into a ball. Lightly grease the mixing bowl, then place the dough back inside. Cover the bowl with a clean kitchen towel or plastic wrap and leave it in a warm place until doubled in size. This usually takes 1 to 1½ hours, depending on the temperature of your kitchen. The dough is ready when it looks puffy and springs back slowly when gently pressed.

Once the dough has risen, punch it down gently to remove large air bubbles. Turn it out onto a lightly floured surface. Divide the dough into three equal pieces. For a neat loaf, weigh the pieces so they are the same size.

Roll each piece into a long rope, about 24 to 28 inches / 60 to 70 cm long. Try to keep the ropes even in thickness so the loaf bakes evenly.

Pinch the three ropes together at one end. Braid them loosely, crossing the outside strands over the middle one, just like a simple hair braid. Do not pull the ropes too tightly, as the dough needs room to rise again. Tuck both ends underneath the loaf to give it a neat shape.

Second Rise and Bake
Place the braided loaf on a baking sheet lined with parchment paper. Cover it lightly with a clean towel and leave it to rise for 30 to 45 minutes, until it looks slightly puffed. This second rise helps the bread bake up lighter. Do not skip it, or the loaf may turn out too dense.

Preheat the oven to 356°F / 180°C. Beat the egg yolk in a small bowl, then gently brush it over the braided loaf. Try to cover the top and sides without pressing down on the dough.

Bake for 30 to 35 minutes, until the loaf is golden brown and sounds hollow when tapped on the bottom. If the top browns too quickly, loosely cover it with aluminum foil during the last 10 minutes.

Transfer the bread to a wire rack and let it cool fully before slicing. Cutting it too early can make the inside gummy.

How to Braid Bread Dough
A three-strand braid is the easiest way to shape this bread. After dividing the dough into three equal pieces, roll each piece into a long rope.
Place the ropes next to each other and pinch the top ends together. Take the right rope and place it over the middle rope. Then take the left rope and place it over the new middle rope. Keep repeating this pattern until you reach the end.
The braid should be firm enough to hold its shape but loose enough to give the dough space to rise. Once finished, tuck both ends underneath the loaf.
If the ropes shrink back while rolling, let them rest for 5 minutes. This relaxes the dough and makes it easier to stretch.
Recipe Tips From the Chef
- Use a kitchen scale for the most accurate results, especially for flour and milk.
- Make sure the milk mixture is lukewarm, not hot. Hot liquid can kill the yeast.
- Knead the dough until smooth and elastic. This helps create a better crumb.
- Let the dough rise until doubled, not just for the time written. A cold kitchen may need longer.
- Divide the dough evenly before braiding so the loaf bakes properly.
- Brush gently with egg yolk so you do not deflate the shaped loaf.
Serving Suggestions
This braided bread is lovely for breakfast with butter, jam, honey, or marmalade. It also works well with Strawberry Rhubarb Jam if you want something fruity and slightly tart.
For a savory breakfast or brunch, serve it with Fried Halloumi, cold cuts, eggs, or Baked Brie with Jam. Since the bread is not sweet, it fits easily next to both sweet and savory dishes.
You can also serve it with soups and salads, or use slices for sandwiches. If you have leftovers that are starting to dry out, turn them into French toast or bread pudding.
For a larger brunch table, serve this Swiss braided bread with Kiymali Yumurta, fresh tomatoes, cucumbers, cheese, olives, and boiled eggs.
Storage and Freezing
Store the loaf in an airtight container or bread bag at room temperature for up to 3 days. Keep it away from direct heat and sunlight.
For longer storage, slice the bread and place the slices in a freezer bag. Freeze for up to 3 months.
You can toast slices straight from frozen, or let them thaw at room temperature first. Frozen slices are especially useful for breakfast because you can take out only what you need.
Recipe FAQs
Yes, but the texture will be denser. For a lighter loaf, consider using a mix of whole wheat and all-purpose flour.
Divide the dough into smaller portions, braid individually, and adjust the baking time accordingly, usually 15–20 minutes.
Yes, you can knead the dough by hand. Mix the ingredients in a large bowl, then knead on a lightly floured surface for about 10 to 12 minutes, until smooth and elastic.
Dense bread is usually caused by under-kneading, not enough rising time, or old yeast. Make sure the dough is smooth and elastic before the first rise, and let it double in size before shaping.
Related Recipes
For more delicious soft and fluffy bread recipes, why not try:


Did you make this recipe? Please let me know how it turned out! Leave a comment below and tag @cookingorgeous on Instagram and hashtag it #cookingorgeous.
I hope you enjoy the process of making this soft and fluffy Swiss Braided Bread as much as you enjoy eating it! 🙂
Want to Save This Recipe?
Enter your email & I'll send it to your inbox. Plus, get great new recipes from me every week!
By submitting this form, you consent to receive emails from Cooking Gorgeous

Braided Bread Recipe – Swiss Butterzopf
Ingredients
- 4 cups plain white flour / all purpose flour (17 ½ oz/500 grams)
- 1 ¼ cups semi-skimmed or full-fat milk
- 3 ½ tablespoon unsalted butter (1 ¾ oz/50 grams)
- ¾ teaspoon salt
- ½ teaspoon sugar
- 1 ¼ teaspoon fast action dried yeast (small pack)
- 1 egg yolk
Instructions
Prepare the Dough
- In a small saucepan, melt the butter over low heat. Remove from the heat and add the cold milk, making sure the mixture is lukewarm before using.
- If using active dry yeast, stir it into the warm milk mixture with the sugar. Let it sit for 5 to 10 minutes, until it starts to foam. If using fast-action dried yeast, add it directly to the flour.
- Add the flour and salt to the bowl of a stand mixer fitted with the dough hook. Give it a quick mix.
- Pour in the milk mixture and start mixing on low speed.
- Once the flour starts coming together, increase the speed to medium and knead for 8 to 10 minutes. The dough should be smooth and slightly tacky, but not sticky.
First Rise and Shape
- Remove the dough from the bowl, shape it into a ball, and lightly grease the mixer bowl.
- Place the dough back in the bowl, cover with a clean kitchen towel or plastic wrap, and let it rise in a warm place until doubled in size, about 1 to 1½ hours.
- Once the dough has risen, punch it down gently.
- Turn it out onto a floured surface and divide it into three equal pieces.
- Roll each piece into a long rope, about 24 to 28 inches / 60 to 70 cm long.
- Pinch the ends together and braid the ropes loosely. Tuck the ends under to give the loaf a neat shape.
Second Rising and Baking
- Place the braided loaf on a baking sheet lined with parchment paper. Cover it lightly with a cloth and let it rest for 30 to 45 minutes, until slightly puffed.
- Preheat the oven to 356°F / 180°C.
- Beat the egg yolk and gently brush it over the braid.
- Bake for 30 to 35 minutes, until golden brown and hollow-sounding when tapped on the bottom. If the top browns too quickly, tent it loosely with aluminum foil during the last 10 minutes.
- Move the bread to a wire rack and let it cool completely before slicing.
Video
Notes
- Use lukewarm milk, not hot milk. If the liquid is too hot, it can damage the yeast and stop the dough from rising properly.
- If using fast-action dried yeast, add it straight to the flour. If using active dry yeast, mix it with the warm milk and sugar first and wait until it foams.
- The dough should be soft and slightly tacky after kneading. If it feels very sticky, add a little more flour, one tablespoon at a time.
- Do not rush the first rise. The dough should double in size before shaping.
- Roll the three dough ropes to a similar length and thickness. This helps the braid look even and bake properly.
- Braid the dough loosely. A tight braid can tear or split as the loaf rises.
- Let the bread cool before slicing. This helps the crumb set and stops the inside from turning gummy.


Sally says
This bread baked up beautifully. Soft inside with a lovely golden crust. Really good with honey, yum!